PVC Musical Headboard Build

5 years old have many things in common. A penchant for poor personal volume control, meth-addict levels of energy, and an OCD like compulsion to make noise. Mine in particular has the “drummer” variant of that condition and so loves to bang on anything and everything. This affliction made manifest is the Blue Man Group, naturally his favorite musical group. So when he needed a new headboard for his bed, we decided to see what we could do let him exercise his inner Blue Man.

Materials were:

  •  4 pieces of  6’  long, 4 inch PVC
  •  4 pieces of 10’ long of 2 inch PVC.
  • 2 & ½ bags of 2 inch 90 degree elbows
  • You’ll eventually need PVC primer and glue as well once you’re ready to lock everything in place.
  • 2 3/8” hole drill bit. (Exterior diameter of 2 inch PVC is 2 3/8)

The math behind the right lengths for the right tones are pretty straight forward – I just followed the recommendation from a PVC instrument instructable by tallman1996 – there he explains:

“I got an equation from nate true that will give you the length of the pipe you need when you plug in the frequency: Tube Length (in) = (13300/(2*Frequency))+(Tube Diameter/2)

For the frequencies of the notes in the range of the piano go here: http://en.wikipedia.org/wiki/Piano_key_frequencies
My low note was number 16 (C2) in the list on the wikipedia page.”

WP_20140209_09_59_01_Pro

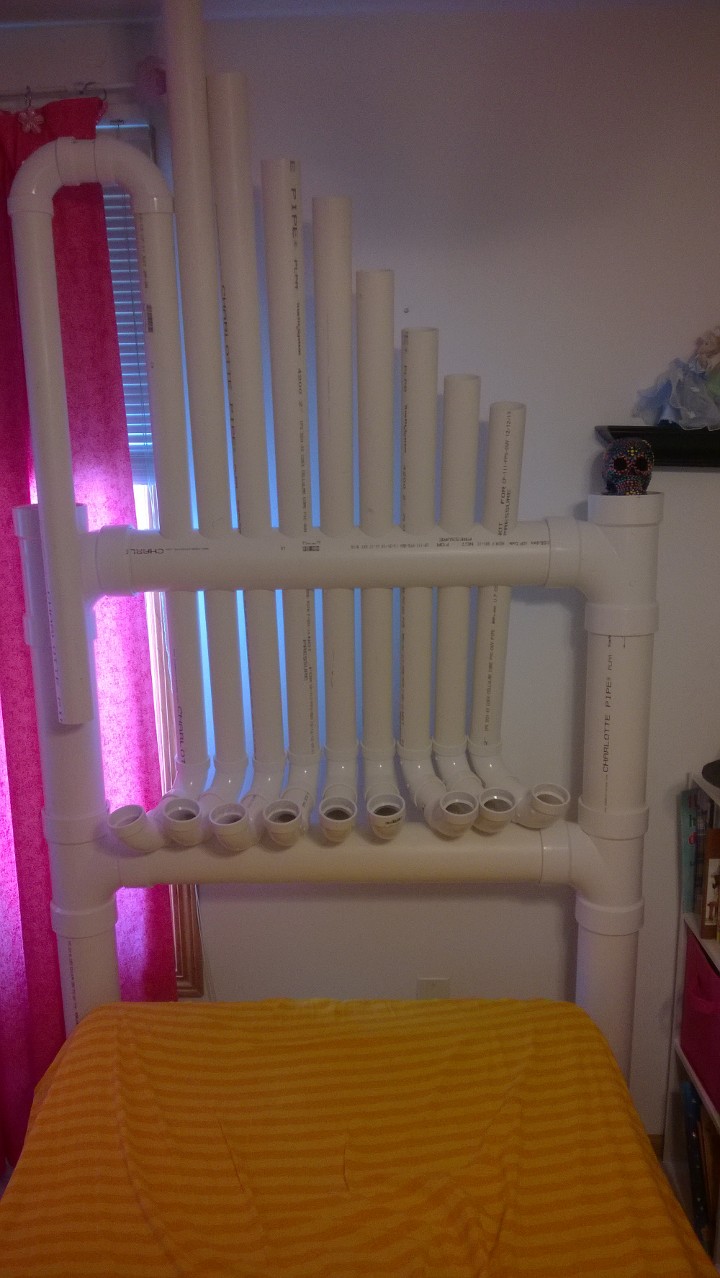
Drilling the holes through the 4 inch pipe was easy, just lay two parallel lines opposite each other on either side of the pipe and mark your drill holes on either side at equal distances from one end. The 2 3/8 hole bit went through easily but you had to keep it completely perpendicular to the pipe or it would jam. I highly recommend you use a drill with a torque setting so you don’t snap your wrist or have the pipe turn and crack you in the head when it jams. Don’t ask me how I know this.

Also, PVC power / flecks have amazing static cling powers so be aware that it’s rather messy.

Since I was worried about the pipe length hitting the ceiling and didn’t want a spaghetti mess of pipes on it I opted for a C3-C4 whole note scale with an extra C2 at the bottom for a nice low note.

It turned out well, we need to paint and glue the PVC together and drill the elbows to the lower cross member but even with the dry fit they stay together pretty well. With the 90 degree elbow on the end, he could continue to stick pipes on it and change or add notes if he’d like.

Paddles for now are just a pair of old flip-flops that will be modified to have handles. Any dense foam rubber will do.

This was also a great excuse to try out my new GoPro 3 on Time Lapse, so here is a video I did of the build:


Quick and Dirty Rain Barrel Stand

So we have two rain barrels on either side of the house that work fantastically well for gathering water to be used for our small victory garden. The only problem with the barrels was that they were too close to the ground so the head pressure wasn’t all that great and it was a pain to get hose attachments on and off. So with some scrap wood I had lying around and gratuitous thievery of the design from this site I built one that would put the barrel up about 3 feet or so.

So the first thing was to take the 4×4’s that were going to form up the legs and cut them all the same length.


Second we want to frame up the legs. The boards I used were a bit sketchy, but with the amount of reinforcement we are putting on it’ll be ok.


The bottom braces are important as they square the legs up to the frame and keep things from shifting. I raised them about a 2×4’s width off the ground so they wouldn’t draw in water off the ground if the legs sunk a bit. 50 gallons is about 400 lbs, so while it might want to sink, I’m also putting this thing on pavers to keep it from sinking / drawing water up into the 4×4’s.

Internal cross members get screwed in from the outside, with the far ends getting screwed to the 4×4’s as well. These are about the width of a 2×4 apart as well, I fudged a little in the middle since it wasn’t exact. This aint rocket science.


I put the barrel on some additional 2×4’s – the original designed called for the barrel to be inside the lip of the 2×6’s to keep it from sliding off but for me that made the nozzle come awefully close to the lip which would have made screwing on the drip line for the plants a pain. When it was on a wood pallet previously it didn’t move an inch.

Preschool playset remodel.

1

My youngest son and nephews pre-school is tiny. Literally it’s two classrooms, but it’s a great environment for them both which includes identical playsets in each class.

Hundreds if not thousands of kids have played on them. Being built in the 80’s when building codes weren’t as strict, they were no longer compliant.

While the wood is still good, had been sanded well and sealed well there were a few problems.  The banister rails been deemed to be too short and the handrails needed to have another one put on the bottom under the other two on either side.

The choices were to surround the play sets with a 6 foot giant landing mat around the sides, or to raise the banister rails and add another handrail. A landing pad would have taken up far too much room in the class so I volunteered to rebuild some of the rails so they met code.

Because construction was going to take a little while (actually it turned out to be a long while, started before Christmas it was finished in early April), the rail cutting / routing / sanding was going to take place off site and then assembled onsite during a weekend afternoon

First thing was to take lots of pictures, and lots of measurements.

2 3 4 5 6 7 8


I did up some high-level sketches just showing how the rails would be raised.


9 10


The next step was to cut up a whole pile of 2”x2” rails to the desired height with a 45 angel cut on the ends to match what was originally there. The rails also had been rounded off with a quarter round router bit, so I did that as well.


11


I knew there was no way I could match the old finish that was on the original wood so I decided to go with something a bit brighter and engaging for the kids mixing blue, red, green and white paints that I had my son pick out. Then it was just a matter of cutting and routing. Here are some shots of the wood after cutting but being painted. The coats ranged from 4-5 to get a deep coverage and then 3 coats of a clear poly to brighten it up.


12 13 14 15

By some miracle the measurements all turned out perfect, which is nearly a first for me. We still have the bottom hand rail to make but that will be easy to do.