Weekend Project — Garden Box

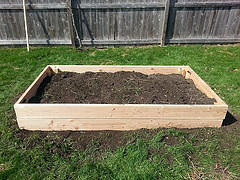
My old garden box pretty much rotted away so I made a new one.  I spent $57 on six 2″ x 8″ x 8 foot boards at Home Depot and did the cutting and some assembling at the Makerspace yesternight.  Today, the kids and I connected the sides together and replaced the old box with the new one.  It looks pretty good.   (Thanks Mike for the help.)

Next, I need to attach the PVC frame I made to hold vegetable netting, and plant some veggies.

gardenbox

Weekend Project — Timed Outlet

I have a cordless drill with rechargeable batteries.  The batteries charge completely in about 20 minutes.  They are not supposed to stay on the charger for longer than that.  However, unless I am standing right there after the charging time, I forget to take the batteries off of the charger.

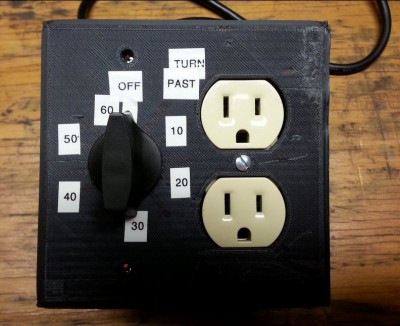
To fix this problem, I made a timed duplex power outlet out of a countdown timer and a duplex outlet.  I plug the timed outlet into a 120v outlet.  Then, plug the battery charger into the duplex outlet attached to the timer.  Finally, I set the timer to 20 minutes and walk away.  (There are more details about the parts and assembly on the Instructable.)

One problem I had is that the faceplate that came with the timer was too wide.  It covered the timer and a bit of the duplex outlet.  I found a Thing on Thingiverse that uses the Customizer to custom build faceplates that cover from one to five outlets with any configuration.  I used it to make a custom faceplate for two outlets with a single hole for the timer on the left-hand side and holes for a duplex outlet on the right-hand side.  I printed it on the Makerbot 3D printer using black PLA filament.  I used 100% infill to make it solid and durable.

 One problem I had with the print was that the raft stuck to the surface in some spots and would not come off.  So, there are a few rough looking spots.  Another problem is that the hole for the timer knob was a bit too small.  I had to drill it out slightly bigger.

 After attaching the new faceplate, I used my label maker to print the numbers for the dial.

That’s it.  No more ruined batteries due to overcharging.  And, it’s portable!

timerOutlet


Home Environmental Sensor Array (Phase 1) Finished

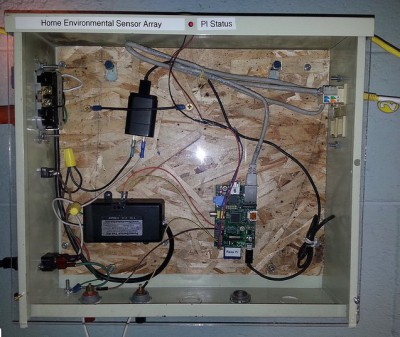
After six months of working on this on-and-off, I installed my home environmental sensor array (HESA) in my basement. Basically, it looks for water in the basement. If it detects water, it shuts off power to my water softener (assuming that the softener is or will, dump more water into the basement), and sends me an email.  The HESA has a Raspberry Pi to detect water and control the PowerSwitch Tail relay.  It also connects to the internet via my home network.

HESA

This is phase one of my HESA project. The device I built in this phase will only detect water. Future phases will add the capability to detect more things and be more interactive.

This is basically, my first real Maker project.  I learned or practiced many Maker skills like soldering, basic electronics, and CNC routing. I made my own PCB (that I did not end up using). I did some basic metal work with a jig saw. I learned how to use several software tools for CAD and design. I learned to program in Python. And I had a lot of fun doing it.

Several Makers at the Milwaukee Makerspace helped me with this project. There is no way I could have built this without them. Thanks to anyone who took time to help me move this project forward.

Wiki project page

Blog

Builders Night Out Saves the Day

I brought my co-worker Joe to the Makerspace last night for Builders Night Out.  Joe has a project to share a motor between his meat grinder and sauce maker machines.  (Not at the the same time but to interchange easily.)  The problem is that each machine has a different size shaft.  He needed an adapter that would allow the motor to connect to the sauce maker.

When we got to the space, Jim introduced Joe to Tom.  Joe explained what he was trying to do.  After five minutes, they had brainstormed a solution.  Less than 60 minutes later, we were putting the tools away and Joe had a working solution that was exactly what he wanted.

Joe came to the space simply looking for ideas.  He left with an elegant adapter that met his need and it cost him nothing.  He (and I) was blown away by the whole experience.

I love the Makerspace!  Thanks to Tom and Jim for their excellent help!

Details

In case you were wondering, the initial problem was to fit a flat, stainless steel shaft into a round socket.  The socket will connect to the motor and turn the shaft.  The shaft must fit snugly into the socket and not move.

There are several ways to approach this problem.  Tom, Jim, and Joe came up with a very elegant and simple solution that did not alter any of the parts and could be disassembled if needed.  The solution was to cut a nut in half, machine down the in sides, and then put the pieces of the nut next to the shaft in the socket.  The nut fit perfectly in the socket.  Machining the insides of the nut took less than 60 minutes to do the work.  The finished pieces pit perfectly against the shaft.

I don’t have pictures.  If I get some, I will add to this post.
3D Printed Tardis

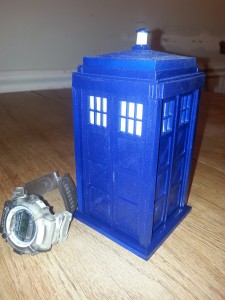
Ahhh, Dr. Who. A British classic loved by generations of slightly different characters. My son happens to be one of those people who are fans of the good doctor (I’m warming up). So, when I saw plans for a Tardis on Thingiverse, I knew I had to make it.

Tardis

I printed the pieces for the Tardis over the last few weeks on our Makerbot Replicator 3D printer, then painted them navy blue.  I still need to add the signs but it is all assembled and looks great.  I’d also like to add some small LEDs inside to make it light up.

The plans for printing the Tardis seem to be one of the better sets on Thingiverse. Printing them on the Makerbot 3D printer is very easy. All you need is the files, and a computer with the MakerWare software connected to the Makerbot with a USB cable (the Makerbot also accepts a SD card but printing directly from a PC is much easier).  The Makerware software turns the drawing files into g-code files that the Makerbot can understand. After MakerWare renders the g-code data it sends it to the printer and Bob’s your uncle.

If you want to print your own Tardis at the Makerspace, the stl files are on the computer in the 3d printing area in the Things folder on the desktop.

The project page on the wiki is here.

Thanks to Joe and Buggs and anyone else who helped me with friendly advice on 3d printing and the Makerbot.