Table Saw Guard

guard04


This started out as an experiment, but it’s working well enough that I might as well call it permanent.

Our table saw came with a blade guard that was attached to a splitter, and every time someone moved the guard, they’d bend the splitter out of position, so it didn’t line up with the blade. Instead of bending it back, people would just remove the guard and put it in some random place where we couldn’t find it, so a lot of the time we were using the saw without a guard.

Over-arm type guards are available, but some people have built their own, so I decided to give it a try. The Lexan sides and the spacers between them were cut out on the CNC router. Everything else was sized to fit the saw. (It’s made for a 10″ blade, but for some reason we have an 8″ blade on the saw right now.) A giant washer acts as a counterweight (it weighs about a pound).

I thought we’d have to fabricate a cantilevered arm from welded steel, or maybe some of the carbon fiber tubing that’s laying around. But first I built a prototype out of 2x4s, and it worked well enough that I decided to leave it that way (I replaced the two clamps with nuts and bolts after the picture was taken.)

splitter02


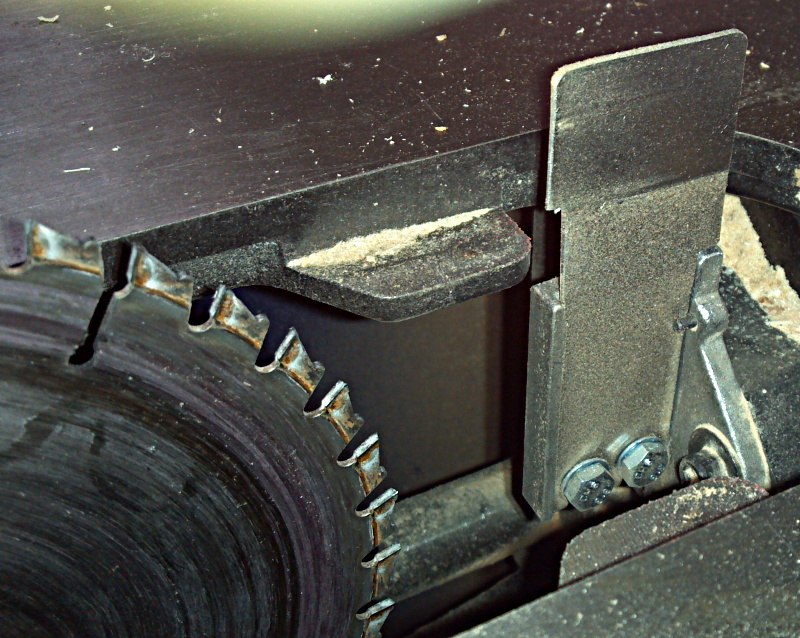
The new splitter was cut from 16 gauge sheet steel on the vertical bandsaw in the metal shop, then filed to fit, and bent with a pair of pliers to line up with the blade. It has slots in the bottom, so it can be removed by loosening the bolts with a 10mm wrench (for certain kinds of cuts that it would interfere with, such as dados). Since it’s not attached to the guard, it doesn’t get bent as easily as the original one.

For more info (including DXF files), see the wiki page:

http://wiki.milwaukeemakerspace.org/projects/guard

Rolling Cart with Retracting Wheels

cart1

When we first started the Makerspace, before we had even rented a building, we talked about having members build rolling carts that would serve as portable bench space with personal storage underneath, and which could be rolled out of the way when they weren’t being used. We ended up using pallet racks for storage, and a random collection of tables and benches for work space. But I always liked the cart idea.

You don’t want the cart rolling around while you’re working, and I didn’t want separate toe brakes on each wheel. After looking at several possibilities, I ran across this page, with a nice solution to a similar problem: http://www.woodgears.ca/mobile_base/table_saw.html

Here’s what I came up with:

cart2 cart3

More info here: http://wiki.milwaukeemakerspace.org/projects/cart

Simple/Cheap Tripod

tripod2

A tripod can be handy for taking pictures of projects, but good ones are too expensive to leave laying around for casual use, and cheap ones can be difficult to use, due to their cheap telescoping legs. The one shown here cost almost nothing to make, and is sturdy enough for my purposes. The triangular hubs were cut from scrap 1/2” plywood on the CNC router, and the “1x2s” (actually .75”x1.5”) were ripped from a 2×4 that cost less than $3.

More info here:  http://wiki.milwaukeemakerspace.org/projects/tripod

Tall Tape Dispenser

tape2

We use a lot of blue tape, and people tend to leave the roll wherever they last used it. If it gets buried under something else, it can be hard to find.

It occurred to me that if we had a tall tape dispenser, it couldn’t get buried, and it would be easier to find, so I built one.

It doesn’t have a cutter yet, but I’m not sure it needs one.


Water Cooler Conversion

cooler

In addition to the obligatory refrigerator full of soda (or sometimes empty of soda, depending on whether anyone’s filled it recently), we also have a water cooler that takes the big 5gal water bottles. They also sell coolers that can be plumbed into a water line, and a while back I discovered that they’re actually bottle-type coolers that come with a conversion kit. The kit consists of a float switch and a solenoid valve, and a mounting bracket that takes the place of the bottle holder.

There isn’t a conversion kit for the cooler we have, but it looked simple enough, so I made one from scratch. I don’t like float switches, so I used two other methods of sensing the water level (I wanted a backup sensor because certain failure modes could result in an unlimited amount of water on the floor, which would be a Bad Thing). Instead of trying to find the “best” way to do it, I used the components I was interested in learning about.


sensors

For more details, see the wiki page:

http://wiki.milwaukeemakerspace.org/projects/watercooler