Home Theater with Insane Subwoofer

After the mediocre commercial successes of some of my previous audio products, I decided to pursue a project that has absolutely no commercial potential.  Although my Automated Gmail Assistant had a 0.1% view to purchase rate, they definitely delighted their new owners!   On the other hand, my novel audio surround sound processor, audio-visual processor and audiophile headphones did not produce any revenue, despite being manufactured in an exclusive edition of one each.  Not to be discouraged, the goal of this project was to expand on the core idea behind the aforementioned audiophile headphones, but to overcome the main two drawbacks of using headphones:  1) Many people find that headphones are too uncomfortable and impractical for long term listening. And 2) most headphones lack the concert-like visceral bass impact, which is that feeling of the kick drum shaking your chest that only rock and roll shows could provide.

BIG_HMMMMMM2

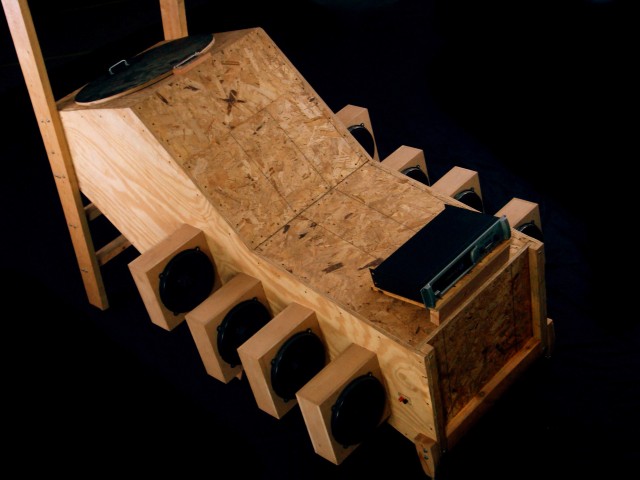
Simply put, the Humorously Maniacal Milwaukee Makerspace Multimedia Machine (HMMMMMM) is a personal sized movie theater, with 5.16 surround sound.  That’s right, this theater is like a conventional 5.1 home theater, but with 15 extra subwoofers to delight the senses. While the bass in a live concert can be felt in your chest, the bass in the HMMMMMM can be felt in your soul(!).  In addition altering listener’s consciousness, the HMMMMMM will soon be used to screen our yet-to-be-filmed Milwaukee Makerspace orientation video as an integral part of our onboarding process for all new members. The HMMMMMM measures about 7 feet long and about 4 feet wide.  An eager movie-goer can simply climb up the integral stairs (shown on the left) and jump in through the 27” diameter escape hatch in the top of the HMMMMMM. Despite its crazy appearance, the HMMMMMM offers a surprisingly comfortable reclining position, much like that of a lazy-boy.  Check out this photo of the HMMMMMM under construction for a better idea of the ergonomic internal layout: There is a pillow for one’s head, and ones feet extend to the right.  The 27” display is mounted to the angled portion on the top surface, about 24” from the viewer.  Eventually, two 24″ monitors will expand the visual experience into the periphery.

The_Incomplete_HMMMMMM4

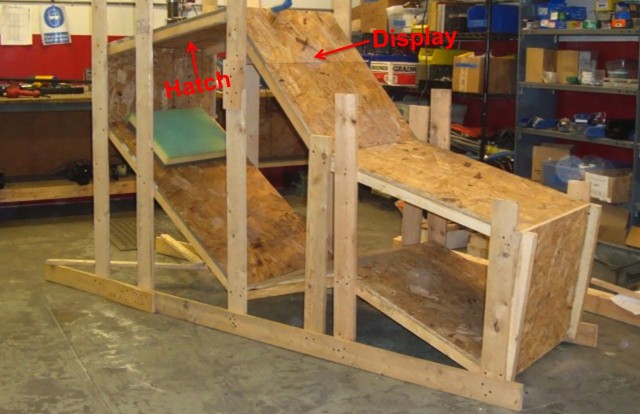
The audio portion of the HMMMMMM is a 5.16 system.  The high frequencies are played by 5 uninteresting Swan/HiVi speakers that are arranged in a properly boring 5 channel surround configuration.  The more exciting portion of the audio system is the subwoofer – well, the 16 (Sixteen) 10″ high efficiency subwoofers that provide that TrueBass™ sensation the masses crave.  Its clear from the use of 16 subwoofers that one object of the HMMMMMM was to create an audio system that plays low bass.  Playback of really low bass typically requires an extremely large speaker box, and still notes as low as 20 Hz are rarely audible.  However, inside any speaker box the bass response is naturally flat to much lower (subsonic) pitches.  For more on the sound pressure level inside and outside speaker boxes, check out this link.  The graph below is a measurement of the SPL or sound pressure level (how loud it is) versus frequency (pitch) at the listener’s ears in the HMMMMMM.

SPL_in_HMMMMMM

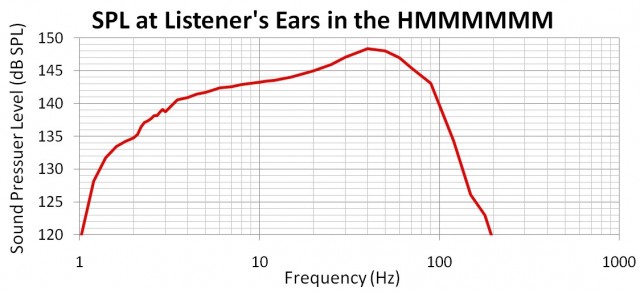
The graph shows that with a sine wave input, the SPL inside the HMMMMMM is 148.6dB at 40 Hz.  That means the acoustic pressure on the 27” diameter escape hatch is 45 pounds.  Excellent.  Note that earplugs in addition to earmuff style hearing protectors are mandatory to safely experience the TrueBass™.   To understand this strict hearing protection requirement, lets compare the sound pressure level inside the HMMMMMM to other audio systems that may be more familiar.  Note that the loudness of these other audio systems are not visible in the graph above, because essentially all other audio systems (including yours) are inferior.  Adjusting the margins of the graph a bit produces the following graph:

SPL_of_many_systems
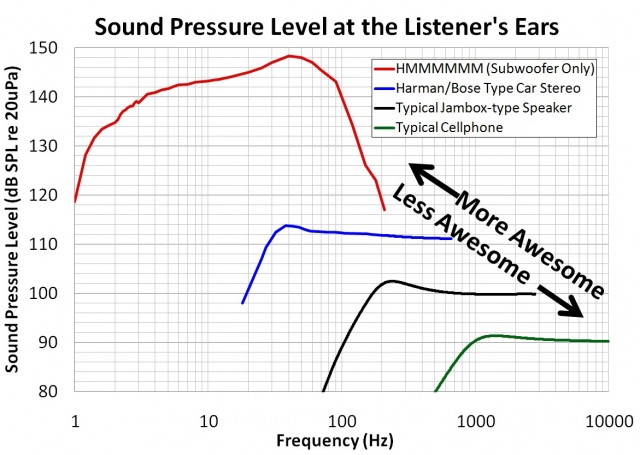
The plot shows how loud typical audio systems are, and how low they play.  For example, cellphone speakers play only a bit below 1khz, and are ~90 dB if they’re 40cm from you.  When a Jambox-type bluetooth speaker is about 60cm from you, it plays ~10 dB louder, and another 1.5 octaves lower, to 200 Hz.  Typical bookshelf speakers can get another 5 dB louder if you’re 1.5 meters from them, but only play down another octave to 100 Hz.  OEM installed car stereos are a big improvement, but they’re still not in the same league as the HMMMMMM.  Yes, the IASCA record holding car is louder than this, but it plays only from 50 Hz to 60 Hz, which isn’t even really bass.

Note that the difference in loudness between a cellphone and a car is 20 dB, while the HMMMMMM is 30 dB louder than a high-performing car stereo.  Also note that the frequency range of a piano, with its 88 keys, is about the same as a bookshelf speaker – a bit over 7 octaves.  Surprisingly, the subwoofer portion of the HMMMMMM has a 6 octave bandwidth, but it plays the 6 octaves you’ve never heard before!  The HMMMMMM plays 6 octaves below what your bookshelf speaker or Jambox calls bass. The HMMMMMM has a +/- 6 dB passband extending down to 2 Hz, with the output at 1 Hz being nearly still above the 120 dB “threshold of pain.”

Disclaimers: For safety, the big 2000 Watt amplifier that drives the HMMMMMM to its full potential is not available when the author is not present.  Ironically, the author has taught 75-100 people, the eager early HMMMMMM listeners, how to properly insert earplugs, meaning that the HMMMMMM is actually a learning tool for hearing safety! Finally, the author has some hesitancy in having the HMMMMMM reproduce recordings with 5 Hz content at 140 dB, because typical hearing protection has little effect at these unnaturally low frequencies.

PS:  Please don’t hesitate to contact me if you’d like to help with the video scripting, filming or editing.

Weekend Project: Planter Boxes!

Last weekend I made three huge, turquoise planter boxes for my rooftop deck – check out the quarter for scale.  Naturally, help from other Makerspace members was key, as I relied on JackD and his JAMbulence for help transporting two sheets of plywood (Thanks!).  I safely sliced ’em up on the panel saw, and then glued, screwed and nailed them together.  After applying numerous coats of outdoor latex paint and a bit of sanding, they’re already in use in downtown Milwaukee!

Planter_Box

Weekend Project: Kitchen Shelf

I’ve recently heard that the Milwaukee Makerspace has a reputation for only having members who are electronics enthusiasts. Well, in addition to the metal, wood, beerwater, whisky, fire, arduino, weldingoddaudiocasting, and numerous acoustic projects that I’ve worked on at the Makerspace, I’ve finished a few electronics projects here. My latest Makerspace weekend project is a shelf for my kitchen, pictured here with the Sad Bananaand three legged pig®.

Kitchen Shelf

Inexpensive Ceramic Shell: Aluminum Casting with Drywall Joint Compound

We’ve been aluminum casting at the Milwaukee Makerspace since November, and I have cast several things since then.  For simplicity, we started by using a lost foam casting method, wherein the form to be cast is fabricated in Owens Corning Foamular 150 (Styrofoam), and is then tightly packed in a reusable, oil bonded sand called petrobond.  The molten aluminum is poured directly on the styrofoam, vaporizing it.  Because the mold is made of sand, the surface texture on the cast aluminum part has the “resolution” of the grain size of the sand.

Ceramic shell is another technique often used in art casting.  The positive of the form to be cast in metal is first created in wax, which is then dipped repeatedly in a silica slurry, that slowly builds up to the desired ½” thickness.  The surface detail reproducible is much smaller/better, as the silica has a much finer “grain size.”  The piece is then put in a kiln to burn out the wax and harden the silica, thereby forming an empty mold.  Typically the mold is cooled, inspected for leaks, patched, and then is buried in regular sand.  Note that to avoid fracturing the mold, it must be heated before pouring.  With all these steps, this process is relatively time consuming and is also somewhat expensive.

Recently, I read a blog post about a quick and low cost ceramic shell alternative that substitutes one or two coats of watered down “Hamiltons White Line Drywall Texture mix” for the tedious ceramic shell process outlined above.  While I couldn’t find that exact product, 4.5 gallon buckets of Sheetrock brand lightweight drywall joint compound (DJC) are omnipresent.  Note that some bags of quick setting drywall joint compound are actually just plaster, and cannot be substituted. I first assembled all the parts needed to make a quick test of the process.  I decided to make some aluminum packing peanuts:

Aluminum_Peanuts_parts

I hot glued the pyramid shaped sprues to the round cup and to the peanuts themselves:

Aluminum_Peanuts_together

I removed half of the 43 Lbs of DJC from the bucket, and poured in 10 lbs of water, taking care to mix it thoroughly with a spiral paint mixer connected to a drill.  Then, I just dipped the whole styrofoam assembly into the bucket, let it dry overnight, and dipped it in a second time.  Immediately after the first dip, I took care to brush the surface of any especially undercut areas, to prevent air bubbles from sticking to the surface.  In the future, I may consider pulling a vacuum on the bucket of DJC to de-gas it.  This may help prevent the formation of air bubbles on the surface of the styrofoam parts.  In addition, I could have first dipped the assembly in surfactant. After two dips, the 1/8” thick shell on the assembly looked like this:

Aluminum_Peanuts_coated

It was a week before the next aluminum pour at the Makerspace, during which time I poured a half ounce of acetone into the mold to dissolve the polystyrene packing peanuts and styrofoam, producing an empty mold.  This step is only necessary when casting packing peanuts, as their polystyrene tends to rapidly expand out of the mold and catch fire, while the pink styrofoam (also polystyrene) is made for homes, and so is much better behaved.  I buried the now-empty DJC mold in ordinary sand, and Matt W fired up the Bret’s furnace, melted a #16 crucible of aluminum, and poured it (Thanks guys!).  After fifteen minutes, I pulled the mold out of the sand, and found the DJC was a little darker.  The act of pulling the mold out of the sand an leaving it to cool over night left it somewhat cracked:

Aluminum_Peanuts_cast

The DJC crumbled off so easily that I didn’t even need a brush.  Also, I noticed that there is more yellowish surface tarnish on pieces left in the DJC to fully cool.  I recommend removing the DJC immediately after the aluminum solidifies.

Aluminum_Peanuts_cleaned

After making a few more, I’m almost ready to safely pack valuables, such as my “Marquis, by Waterford” crystal stemware:

Aluminum_Peanuts_in_use

Finally, check out the phenomenal surface detail that this process can reproduce.  For scale, this peanut is 1.5” long.  The surface texture on the front face is about ~0.002”!

Aluminum_Peanut_closeup

Thanks to Jason G for this last photo.  Also, a big thanks to Dave from buildyouridea.com for letting me know that one or two dips will do it!

FEAR


I’ve updated Robert Indiana’s iconic sculpture “LOVE” for our times!  While “Love” may have been an appropriate sentiment from 1964 to 1970 when the 2D and 3D versions were made, I think that the revised text is more appropriate for the 2000’s and 2010’s. Fear is 8” tall and 4” deep, and while not a monumental outdoor sculpture, FEAR appears fairly sizable on a table top.

Fear, which is solid aluminum and weighs over 7 lbs, was cast last Thursday with quite a few other pieces.  The great thing about having an aluminum foundry at the Makerspace is that the whole thing cost about $7!  – $4 for propane, $1 for Styrofoam, and $3 for some Rotozip bits.  If FEAR were cast in bronze, it would weigh over 20 lbs, which would cost $200 for the metal alone.  As it is, we melted down old heat sinks, stock cutoffs and hard drive frames, so the metal is essentially free.

In the spirit of Indiana who made his own font, I drew FEAR up in Inkscape using Georgia Bold, but I increased the height of the Serifs a bit.  Shane helped me with the file manipulation and G-code generation (Thanks!), so I could use the CNC router to cut FEAR out of styrofoam.  I exported FEAR’s hairline thickness outline as .dxf so it I could bring it into CamBam to generate the G-code. The outer contour of FEAR was selected, and the following settings were chosen:

  • General -> Enabled -> True
  • General -> Name -> Outside
  • Cutting Depth -> Clearance Plane -> 0.125 (inches)
  • Cutting Depth -> Depth Increment -> 1.05 (inches)
  • Cutting Depth -> Target Depth -> -1.05 (inches)
  • Feedrates -> Cut Feedrate -> 300 (inches per second)
  • Options -> Roughing/Finishing -> Finishing
  • Tool -> Tool Diameter -> 0.125 (inches)
  • Tool -> Tool Profile -> End Mill

Identical settings were chosen for the inner contours of FEAR, with the exception of General -> Name -> Inside.   Then, I just selected “Generate G-code.”  Check out the real-time video of Makerspace CNC router running the G-code and cutting out the 1” thick Styrofoam (Owens Corning Foamular 150).

After cutting four 1” thick pieces, they were stacked and glued together.  I buried the foam FEAR in petrobond, and then attached Styrofoam sprues and vents.  For a more complete explanation of the quick lost-styrofoam casting process, check out this post.   Stay tuned for details of our next Aluminum pour, which will be in January in the New Milwaukee Makerspace!