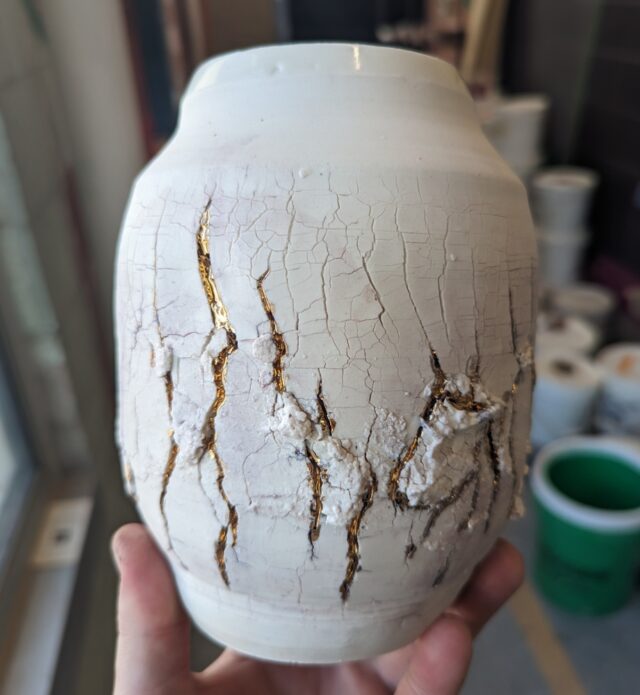
More Laser Cutter Artwork….

A laser cut piece, one stacked on top of the other for depth.  The top piece is a cut out featuring an angelic grave stone and the back piece is a picture of a graveyard with some well defined trees.

This is my newest piece, cut and etched on our 60 watt laser cutter.  Both images are from pictures that I took out at a couple of graveyards.  I inverted the image in the background so that the sky was nice and dark and the trees were bright.  Unfortunately, this washed out a lot of the tombstones in front, so I’m going to try re-etching this piece before I offer it up for sale.

The back piece took approximately 1 hour, 20 minutes to etch as a 11.5″ square.  Additionally, I found that the margins are a bit off on the cutter.  The left margin has shifted around 1/8″-1/4″  to the right, so the piece wasn’t perfectly centered.

Vacuum Forming

Due to repeated collisions with the ground, walls and every other structure in the area,  my miniature Quadcopter required some plastic surgery.  I contemplated using the large vacuum former at the space to make replacement bodies, but my quad is only 4 in. 101.6mm in length, so I decided to make a mini vacuum former.

My first step was to aquire a heating source, so I picked up a toaster oven for $6.00 US, at a local thrift shop.

http://www.flickr.com/photos/90705910@N06/8236346286/in/photostream

I  used CamBam to design the frame to fit in the toaster oven.

http://www.flickr.com/photos/90705910@N06/8235277147/in/photostream

I used the CNC Router to cut the pieces. 

http://www.flickr.com/photos/90705910@N06/8236347072/in/photostream

I assembled the base and inserted a piece of Non Glare Picture Glazing in the frame.  The first time I tried it I set the oven at 400 f /5 minutes.  The plastic was too pliable and turned out very brittle.  The next attempt was using 300 f /3 minutes (using some thicker plastic I found in the scrap heap. That didn’t seem to be enough heat or time.  The final attempt I used more of the Non Glare Picture Glazing at 350 f / 4 minutes, and that turned out to be perfect. Vacuum Former

Submission for the 100 Square Feet of Art Charity Event

The picture consists of a laser-cut vine motif with an orchid laser-etched in the center, raised a half inch above a laser-etched picture of a creek with large rocks.

Art for charity’s sake


When Raster mentioned the event, “Red, White, & Black: 100 Square Feet of Art“, I thought I’d take part.  The general idea is for artists to pick up a 12×12″ piece of wood and “art” it somehow, transforming it into a mini-masterpiece for an auction to support pets in need.  The auction takes place on December 7th, so be sure to stop in.  They’re featuring live music and food along with a raffle and the auction.

Taking a cue from some Art Boxes I’d been working on, I decided to use a similar vine motif with an orchid etched in the center.  After studying it for a while, I thought it needed depth, so I laser etched a photograph that I took out at Boerner Botanical Gardens for the backdrop.

Still not content, I wanted the darker shadows of the vines to play along with the lighter picture behind, so I cut several half-inch blocks to raise the top piece above the back piece.

The back has been treated with teak oil while the front was stained with Bombay mahogany satin stain.  The blocks are put specifically in each corner in order to maximize the amount of light that hits the back piece.  I may add a few extra spacers for support in the coming days.

Cardboard Cell Phone Case


In case you haven’t noticed, I tend to work with cardboard. It’s a cheap material, there’s always some around, and quite frankly, the cardboard box is one of the marvels of the modern world. (Seriously, think about UPS, modern shipping and packaging…)

In fact, this summer, I even built an entire kid’s playhouse from cardboard. It’s also great as a 3d/practical stand-in for items that may otherwise be heavy, dangerous, or impractical. (See the video on C.A.D. at: http://www.youtube.com/watch?v=2f3yZpHzKv8 )

So, it should come as no surprise when I tell you that I just created a cell phone case from cardboard!

One of my current “back-burner” projects to create a specialty smart-phone case. I don’t want to give away the awesome “bonus feature” it will have, but to start with, I just needed to design a basic case. I had kicked around a few ideas, such as 3D printing it. But that didn’t turn out so well. Of course there I was using somebody else’s design, which just was NOT optimized for my 3D printer. Plus, I really don’t have any 3D modeling skills (yet. I’m learning!)

I DO have access to the Laser Cutter at the Milwaukee Makerspace. Which got me thinking that maybe I could create a laminated case, based on several layers of laser-cut plastic. (The concept is similar to this mini-computer case.)

However, I’m still really just in the planning stages of this project, and the Makerspace is nearly two hours of travel round-trip for me. So, how can I keep prototyping my project with just a few spare minutes at home? The answer is cardboard.

Among carboard’s many great qualities: I already have it; I can cut it with a knife, razor, or scissors; it’s a 3D tactile material; and I can cut and use it RIGHT NOW.

I had already designed a basic case in Adobe Illustrator, by drawing over the top of an image of the iPhone I downloaded from Apple. Would you believe that the radius of the default setting of the “ROUNDED RECTANGLE” Tool is EXACTLY the same as the corners of the iPhone? Who would have thought? But it did make it easy to layout a front, back, and middle of a layered case.

I printed out the images onto regular 8.5×11 computer printer paper, cut them out, and then traced them onto some junk cardboard. I then cut the cardboard with a scissors and exacto-knife. I stacked the two “middle rings” around the phone, and sandwiched it between the front and back pieces.

Now all I needed was some way to hold it all together. If this were some sort of final project, I would likely glue the layers together, but as it was, all I really needed some something simple and temporary. Sticking with my office supplies theme, I grabbed two rubber bands, and slipped them around the cardboard near the top and bottom.

In only a few minutes, I went from an idea, to a drawing, to a real-world three-dimentional object, all WITHOUT a 3D-printer, a laser-cutter, or any other modern micro-manufacturing machinery.

While this was just a simple little mock-up, I was impressed with how well it turned out using only low-tech, on-hand materials.

Do you have a project in mind that you want to work on? Could you find a thrifty and low-tech way to do it using simple, recycled, or salvaged materials? Give it a shot, you might be surprised at how well it works out!

-Ben

LegoLamp follow-up

There are some issues . . .

It’s not going so well . . .

In a previous post, I outlined the plan for constructing the LegoLamp.  It was good theory, but not really workable.  This post will be a “what I learned,” rather than “look at what I built.”  The picture tells the story.

Legos are rectilinear, the cylinder is not.  Which means the contact between them is a line.  That’s not a lot of gluing surface.  Ideally, I would have cut the brick-end to match the curve of the cylinder.  But Lego are hollow.  Removing that much material would have removed the end of the brick.  I counted on the relatively thick hot-glue adhesive to smoosh, expanding the area of the joint.

The laser-cut template has very tight tolerances.  This was deliberate.  Making the template tight allowed it to serve, in theory, as a substrate for the next layer of bricks.  The tight fit to the current layer of bricks would hold the template perpendicular to the cylinder.

In the background, you can see the hot-glue gun has been retired.  There is a yellow, plastic-razor-holder next to it.  Hot glue was not the proper adhesive for this job.   I installed, removed, and scraped, 3 layers of bricks — twice — before abandoning the hot glue.  The template is so tight, it leaves no room for adhesive.  The glue gets scraped-off and smeared onto the cylinder as the brick is fit.  After the first layer, placing a brick is not merely a matter of fitting it into the template.  The template must be aligned with the lower layer of bricks so that the new brick will snap onto the one beneath it.  The glue is not-so-hot by the time the template is properly aligned and the brick is inserted.  The resulting joint is weak.

I switched to two-part epoxy, to gain a longer working time.  In short, it still wasn’t sufficient.  Five minutes was long enough to place the persnickety first brick of a row, plus 3 more.  Then the epoxy became unworkable, and I had to dispense more.  I wasted a lot of epoxy.  Adding insult to injury, the working time was 5 minutes but the minimum set time was 20.  That means 30 minutes per layer.  Sixteen layers is 8 hours of gluing.  That’s too long.  And, the epoxy had the same smearing and small-contact-surface issues as the hot glue.  Some of the epoxy joints are no stronger than the hot-glue joints (i.e., they fall apart if touched).

The template works as a substrate for the next layer of bricks.  But the etched outline is not sufficient to accurately place that next layer.  When the template is rotated & raised to lock onto the 2nd layer, it doesn’t fit.  The bricks are not placed within the tolerance of the template.  I can’t use the template to support the new layer as the glue sets.  Without that support, the bricks tend to fall out of parallel as the adhesive sets.  This makes the next layer even more difficult to place, stresses the lower layer’s joint in the process, and results in collapses like the one in the photo.  I created support structures from other pieces of Lego.  These work for the initial layers.  But they add to the difficulty of placing a brick.  They can’t be used after the first 5 layers, because there’s no space for them.

Clearly, it’s time to back away from the project and rethink it.

Easy Star Trek “Red Shirt” Costume

I always have the best of intentions. When getting invited to a costume party, I plan to put lots of time and effort into it to create an EPIC costume. Time after time, I put it off and come up with something at the last minute.

The great thing about a costume is that you DON’T have to spend lots of money on one. In fact, you can create a very good costume, just from clothing and props you already had.

Recently, a friend had been working on a Star Trek prop, which got me thinking about how simple a Star Fleet uniform would be to make. Not a perfect one full of detail, but something fun, simple, and cheap.

To start, I gathered together a red T-shirt, black pants and shoes. I didn’t have a long-sleeved shirt, so I just layered the red short-sleeved over a black long-sleeved T-shirt.

A Federation insignia or communicator badge is an important element to the costume, but is simple to make. I just went to the web and did an image search. When I found one I liked, I downloaded it, scaled to to about 2.5″ tall in my graphics software, and then printed it onto tag-board with my inkjet printer. I cut out the insignia, and put a piece of tape on back. A safety pin glued to the back would work great as well. From just a few feet away, it doesn’t look like paper at all, it just looks like the logo you expect to see on the uniform.

Of course no Star Fleet Officer on an away mission would be without a phaser. I had several to pick from: a TV remote, an infrared thermometer, or my cordless beard trimmer. Basically any dark plastic item that you can point threateningly can be a phaser. I chose a digital tire pressure gauge as my hand-weapon of choice.

Also handy would be a tri-corder. I DID spend a bit of money on this one – $.99 cents. Since I happened to have a smart phone, I downloaded a tri-corder app. It has lots of blinking lights and sound effects that add considerably to the outfit.

I also wanted to point out that I was NOT a main character. Nope, not Kirk or Picard or any of those guys – just a nameless red shirt that’s guaranteed to get killed by the alien/monster of the week. To do so, I created a “Hi, my name is:” badge from a computer-printable address label and a marker. I tried both “Red Shirt” and “Expendable” as name-tags. At the one costume party I went to, people got the joke and had a good chuckle – and then had an urge to kill me…. (Lion-O quickly took me out with the Sword of Omens.)

So, remember, a costume doesn’t have to cost a fortune in time and money – just recycle some clothes and other items into a simple and clever outfit anyone can appreciate.

-Ben

A Family of Cut-Out “Art Boxes”

A family of 5 two-inch square wooden boxes featuring gears, vines and Celtic knots

Well, this all started as a small experiment which I didn’t expect to work.  Originally, I had conceived of the “Vine” box on the lower left as something to etch onto a series of rather banal boxes that I’m making.  In a sudden fit of “Oh, what the hell,” I decided to put our 60 watt laser-cutter to the test and actually cut out the shapes, rather than etch them.

The first Vine Box didn’t turn out so well, but the idea was there and I went home to further tweak the image so that it would cut out properly.  Once I achieved success, images, questions, and potential swam around my head.  What else could I cut?  How fine could I get it?  Does Ashton Kutcher really think that “Dude, Where’s My Car?” is a good movie?

More experimenting followed and the results of said experiments are pictured above.

Ultimately, I will be making these and other Art Boxes for sale to the general public on Etsy, but in the mean time, I’m testing out further designs so that I’ll have a full product line up when it comes time to open the store.

Milwaukee Makerspace Moves It

Milwaukee Makerspace’s new building at 2555 Lenox St. used to be the home of a data center and had two computer rooms, each with a raised floor. On Saturday, 10/27/12 several members got together and removed the last of the tiles and posts.

Roughly 1,000 tiles, each weighing 18 lbs., were removed from the west room and stacked in a dumpster for recycling. The west room took about 90 minutes to complete with 7-10 people! Thanks to everyone who turned out and we’ll be posting more news as the building comes together!

Nerdy Derby ReCap

Derby Car

It’s been a few weeks, but honestly, it took that long to recover! Yes, we all survived Milwaukee’s First Nerdy Derby race (well, a few cars may have been damaged) so here’s a look at some of the coverage.

Ed put together this great video of the race…

Kevin put together a car that was deemed too dangerous (or was it ‘too awesome’?) but you can read about that here.

Sling Shot

Collin’s car won the “Longest time” category, and here’s a video of Rolling Thunder in action…

Have Blue put together a super-detailed blog post about his car, which definitely won the speed competition, and also won the “Run backwards up the slope and launch” category.

There’s more car photos on Flickr. I’ve been told a few people want to have another race, and this time we may even need “motorized” and “non-motorized” categories as multiple cars sported propellers, motors, ducted fans, etc.

I’m not sure if anyone bothered to keep track of all the winners in all the categories (we created about 8 categories you could win) but the main thing most people will remember is the fun we had. Kids and adults were cheering and laughing during the race, and also had a fun time just building cars out of all the scrap we supplied. It was probably the most awesome thing that happened at BarCampMilwaukee this year.

I’d also like to give a big thanks to Buggs, Vishal, and Brant for providing the track and running the race. A little organization goes a long way!