 Materials:
- Clear acrylic tube, 3″ O.D.
- 4×2 LEGO bricks, 6 per layer
- Ceiling-mount shade holder (like this one)
- Hot glue or specialty adhesive (e.g., Weld-On #1802)
- Template material (flat, at least 6″ square, 5/16″ thick)
Initial considerations:
3″ O.D./2.75″ I.D. tube is appropriate for a ceiling-mount shade holder. That greatly simplifies the wiring and allows a standard bulb to be used. Incandescent bulbs get much hotter than CFL bulbs. Airflow around the bulb is likely to be restricted. Cooler bulb is better. Distorted or discolored acrylic is not pretty.
Acrylic tube is not the only option. Transparent PVC and polycarbonate are also viable.
Spacing between “vanes” is important. Because the light-source is inside the bricks, they will cast dramatic shadows and restrict the amount of light projecting into the room. The 3 screws attaching the tube to the shade holder require equidistant holes. Space must be left for them.
A child may not understand the difference between decor and toy. A ceiling mount places it out of reach. The 3-screw attachment should be easily adaptable to other mounts, should they be desired later.

Template illustration
Each brick hinges on the corner nub of the brick below & behind it. Thus each one is half a brick ahead of the one below & behind it. Brick edges are straight, so the ends will only touch the tube at their centers. A triangle, formed by the center of the tube and the centers of connected bricks, has a vertex of 12° (see illustration).
Use a template to ensure the bricks are glued in the correct orientation and spacing around the tube. The template has brick-shaped holes for already-attached bricks, and indicator-lines showing where the next brick should be placed.
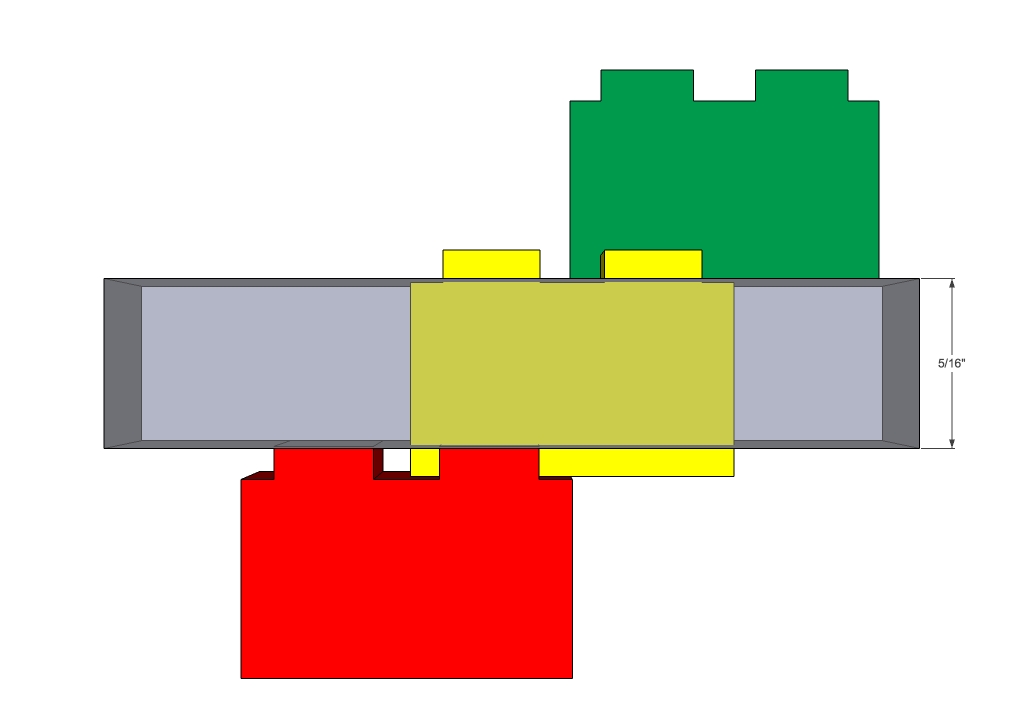
Correct thickness of template
The thickness & rigidity of the template material are important. In this illustration, the template rests on the red layer of bricks, is held in the correct orientation by the yellow bricks, and supports the new, green, bricks while the glue sets. If the template is too thin, the leading edge of the new bricks will drop. Instead of stair-stepping up the side of the tube, the “vanes” will droop and level-off. If the template isn’t rigid (say, cardboard), it will flex under the new bricks with the same result. (I used sheet acrylic.)
The correct thickness of the template is equal to the distance from the bottom of the new layer of bricks to the top of the nubs on which it rests. Note that this is not the same as the thickness of a brick! It’s the thickness of a brick, minus the height of its nubs, then minus the height of the nubs on which the template rests. 7/16″-1/16″-1/16″=5/16″.
Construction:
The Tube: How long should it be? As long as you want. In my case, I noticed that 6 inches is an even multiple of the brick-height (3/8″ per brick * 16 bricks = 6″). So my tube is 6 1/2″ long. The extra half-inch is to accommodate the nubs on the topmost layer of bricks and provide clearance for the shade-holder. I cut the tubing on a table saw. The technique recommended by the manufacturer is to raise the saw blade to just above the thickness of the tubing, then rotate the tubing, in place, on the blade. In my case, I used a cross-cut sled to ensure the cut was perpendicular all the way around the tubing.
The LEGOs: 16 bricks per “vane” * 6 vanes = 96 bricks. I decided to use equal numbers of each color, so I needed 24 bricks each of red, yellow, green, and blue. I purchased used bricks and a large LEGO plate in an on-line marketplace.
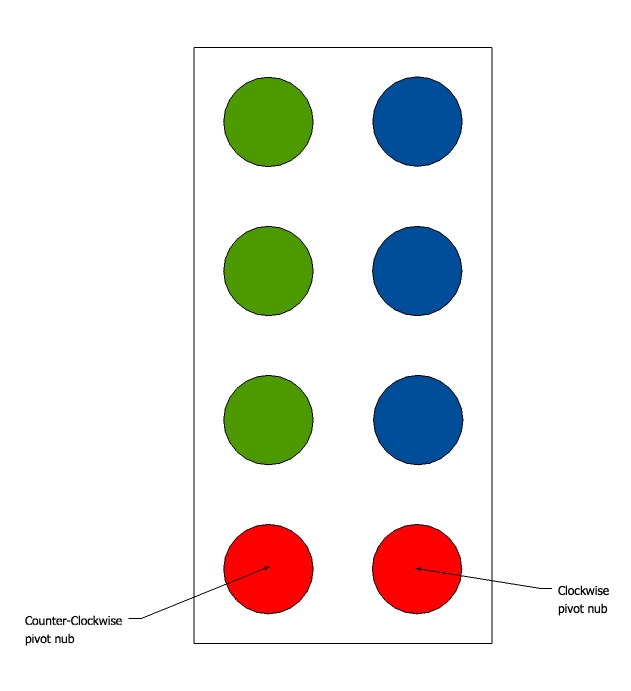
Don’t cut the red ones!
Because each brick must rotate 12° relative to the brick on which it sits, 3 of the 4 nubs must be removed from one side of each brick. Important: Decide which way your bricks will rotate before you remove the nubs, and remove the same 3 nubs from each brick! In the illustration, the red nubs are closest to the tube. Do not cut those! Those are the pivots for the bricks that will attach to them. If you want the bricks to spiral clockwise up the tube, remove the blue nubs. If you want counter-clockwise, remove the green nubs. Note: you don’t need to remove the nubs from the top-most 6 bricks. In fact, it will probably look better (from the ceiling, anyway :~) if you don’t.
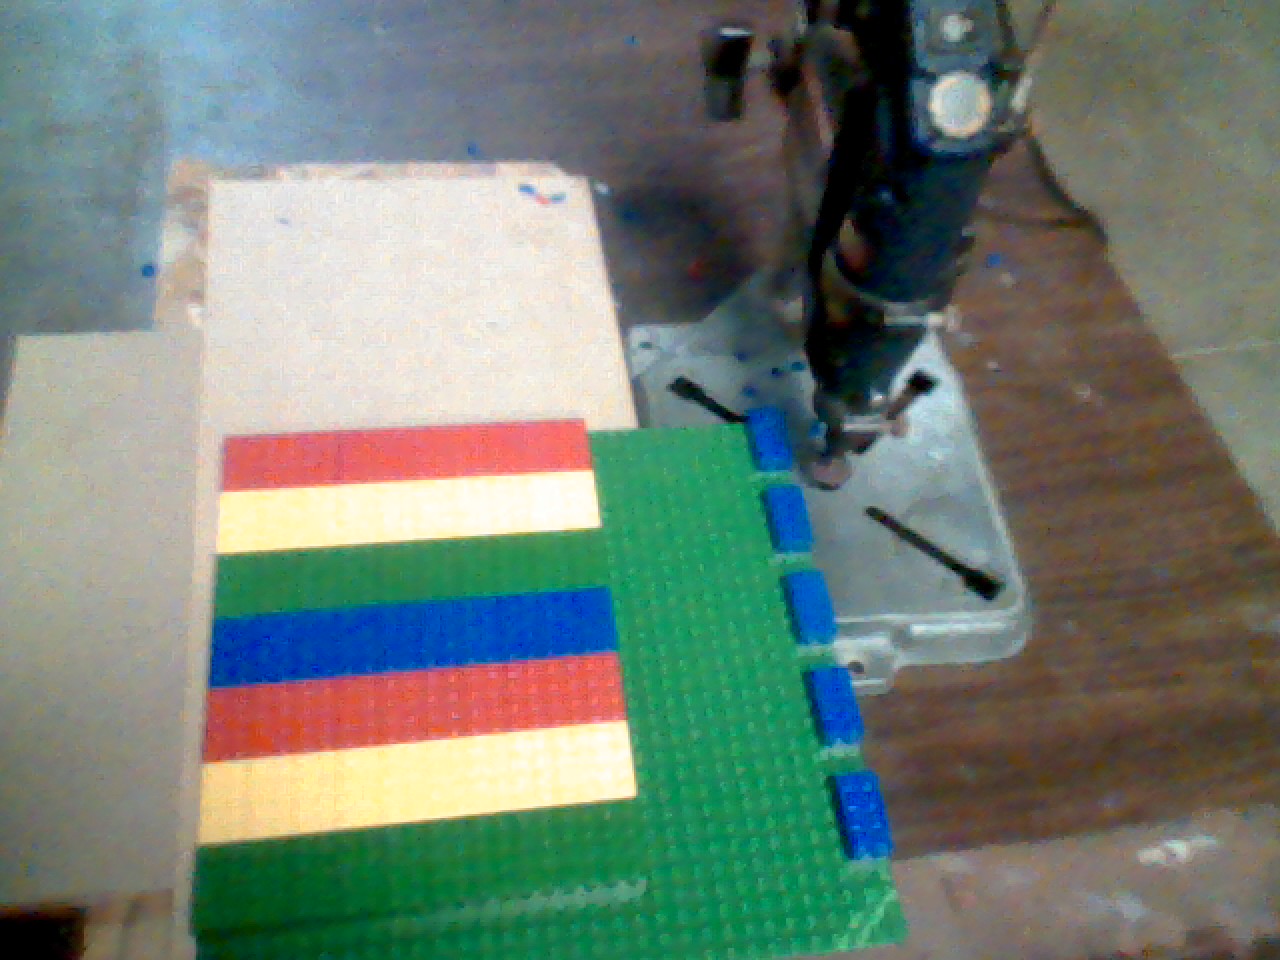
My set-up for removing the nubs
I used a rotary tool, fixed in a stand, to remove the nubs. I used a standard cut-off disc. I adjusted the height of the tool so that the bottom of the disc was at the bottom of the nubs. I used a big, green LEGO plate to hold the bricks in place, while I cut them. The plate allowed me to keep my fingers well-away from the spinning blade, but still manipulate the brick being cut. I left a gap between the pivot end of one brick and the next brick. This made it easier to avoid accidentally removing the pivot nubs. (Note: molten plastic is hot.) After cutting, the bricks required some touch-up work with a knife, to remove the plastic still attached to the edges. Also, the nubs are discs that sit atop holes in the brick. Removing the nub reveals the hole.
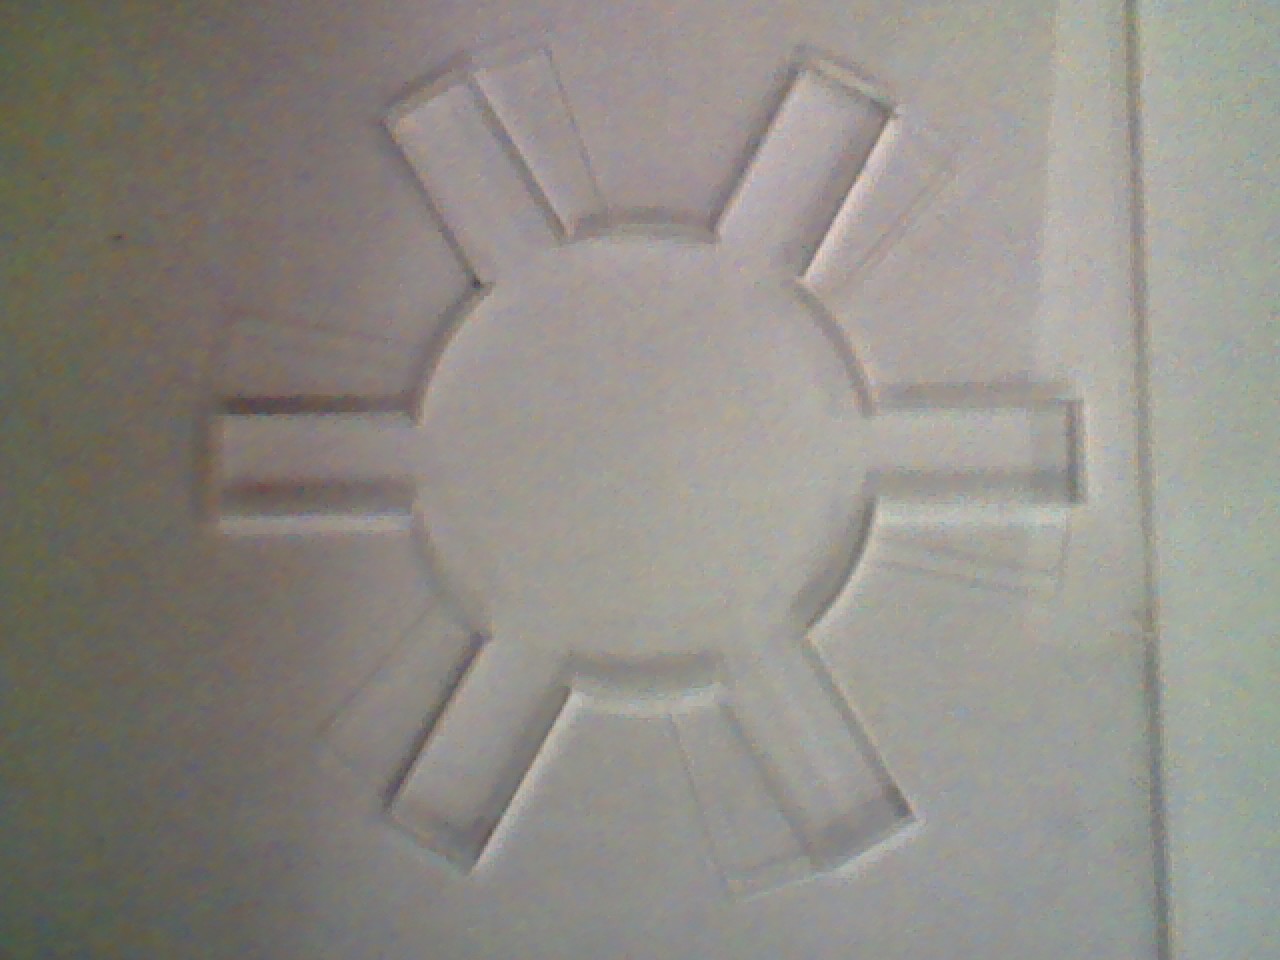
Laser-Cut template
The Template:I found some scrap acrylic of the correct thickness. Shane was kind enough to redraw my template sketch as a vector, and show me how to use the Makerspace’s laser-cutter (Thanks, Shane!). We cut the template in multiple passes. The first pass included the outline for the “next-up” brick. Subsequent passes did not. That produced the desired through-cut with adjacent guidelines.
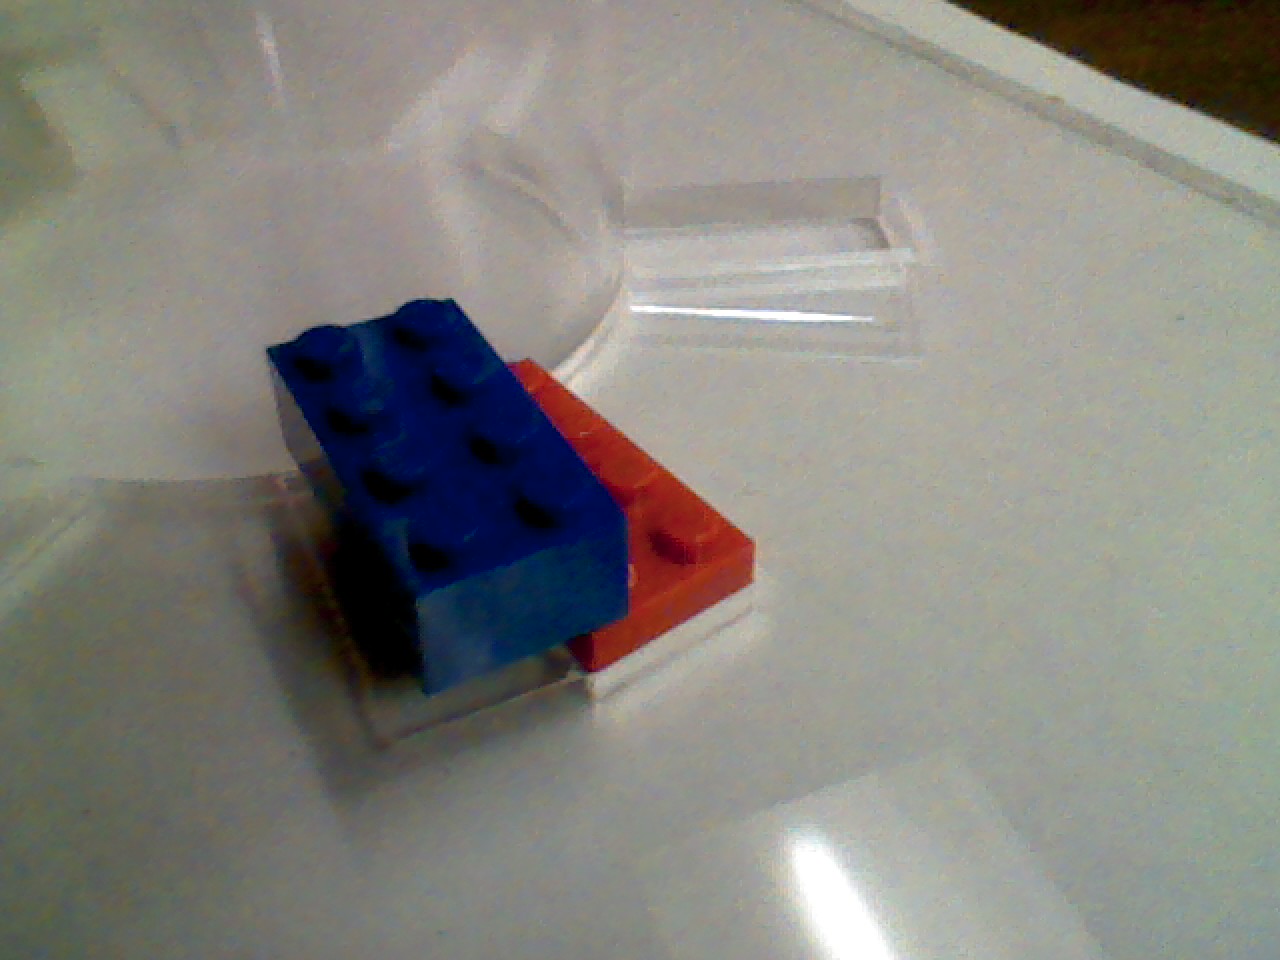
Template test-fit
This image shows the template, a short length of tube, and a pair of test bricks (3 nubs have been removed from the red brick). Notice how the template aligns the red brick, and how the guidelines show correct placement of the blue brick. Note: The template is resting on the table, not on a lower layer of bricks. That’s why the blue brick doesn’t rest on the template.)
That’s as far as I’ve gotten. I’ll post again when the project is completed.
The uses for LEGO® are endless! http://t.co/wZp2moQr
[…] a previous post, I outlined the plan for constructing the LegoLamp. It was good theory, but not really […]