I was a “Grammar Police” officer for Halloween this year. My costume consisted of some standard police equipment, as well as a dictionary, thesaurus, citation tablet, red pens, and, of course, my lovely custom badge!
Step 1: Design.![]()
I scoured the web for pictures of “grammar police” shields, but ended up creating this design in Microsoft Word, using clip art from the web, generic shapes from Word, and shaped text boxes. It was pretty simple and used the software I had readily available. The portions of the design that are solid black are the parts that will be etched into relief during the process.
Step 2: Create!
With much encouragement & assistance from a fellow Makerspace member, Jon (of Dalek Asylum fame), I crafted this badge using mostly jewelry-making tools & methods. We first spray-painted a square piece of copper, then used the laser printer to burn away the paint from the sections that were solid black. This gave us access to the “fields” that would be eaten away in the etching process, giving the piece segments of relief.
After some clean-up (note to self: don’t use abrasive cleaners at this step next time! and maybe not industrial spray paint, either), we left the copper square to soak in ferric chloride for approximately 45 minutes. We checked the progress of the etching every 15-20 minutes, and decided that after 45 minutes we had enough of an etch to give the details enough depth to stand out.
After more clean![]() -up to remove the ferric chloride & remaining paint, I had a nice, shiny, scratchy piece of copper with an etched design. At this point, I really started finding my way around the jewelry bench. I used a small jewelry saw to cut along the outer lines of the badge, which was frustrating until I found the right rhythm for cutting. My badge was finally starting to take shape!
-up to remove the ferric chloride & remaining paint, I had a nice, shiny, scratchy piece of copper with an etched design. At this point, I really started finding my way around the jewelry bench. I used a small jewelry saw to cut along the outer lines of the badge, which was frustrating until I found the right rhythm for cutting. My badge was finally starting to take shape!
From here, I filed the edges smooth & buffed the finish to remove some of those fine scratches. I gave the piece some dimension by using tools at the jewelry bench to accentuate the “belly” at the bottom of the shield. Once it felt reasonably even and I was happy with the general appearance, we applied a liver of sulfur gel to the surface of the badge.![]()
The liver of sulfur settled nicely into the etched corners, giving the piece an aged patina and highlighting the small details. I really like how it settled into the fine lines left by the etching solution around the perimeter of the main field! The small striations in the copper there give it a very unique appearance. The patina provided by the liver of sulfur also helped hide some of those fine scratches I mentioned earlier. We wiped off the excess & applied a museum-quality wax, since the badge will be worn and handled like jewelry, to maintain the patina.
Step 3: Profit(?)
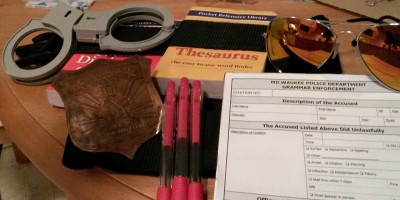
The badge was added to my collection of Grammar Police equipment, which included shiny aviator sunglasses, and a tactical belt (excess nylon webbing with a clasp) with a dictionary, thesaurus, red pens, custom grammar citation padlet, and toy handcuffs. It was quite the fun costume, and even though none of my trick-or-treat’ers understood, all my friends did!
Thus ends the story of my first Makerspace project. Oh, what fun it was!
Excellent write-up detailing your steps. I’m going to share this on Facebook.
Thanks, Kathy!