Laser Cut Road Trip Coasters: Improved!

I used the Makerspace 60 Watt laser cutter to make coasters that show the path of some road trips I’ve taken.  That way I can enjoy the sweet irony of sitting on my couch enjoying a tasty beverage while having thoughts of travel!  This project was somewhat inspired by mmassie’s OpenPaths Zurich vacation keep sake project.

As I don’t use OpenPaths, I used Google maps to plot the course of past road trips, and simply took screen captures.  I wanted to create vector images with hairline width (0.001″) lines so the laser cutter can make each coaster in 45 seconds instead of 20 minutes. There are many ways to generate vector data using these raster .png images. I chose to semi-manually edit out unnecessary parts of the images using GIMP, and then used Inkscape to extract vector data from the resulting simplified images.  If you’re new to these tools, just search for “Inkscape raster to vector” tutorial videos.  An alternate approach is to just import the raster image into Inkscape, and use the Bézier line tool to trace the important paths.  Yes it is manual, but this alternate method also only takes 5 minutes to complete.

The coasters are cut from 3/16″ 4″ x 24″ solid basswood using fairly standard settings of 100% power, with 100% speed for etching, and 3.5% speed for cutting.

trio_s

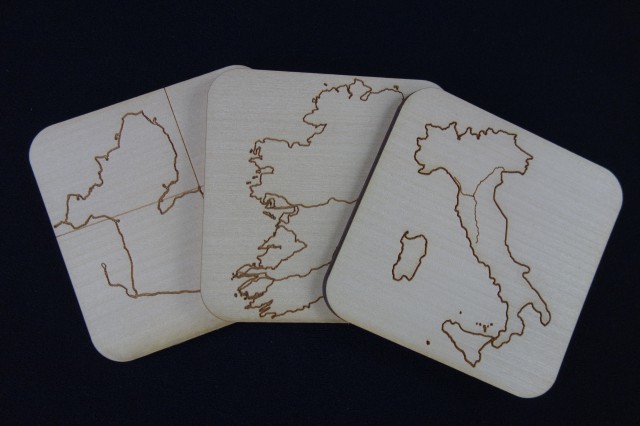
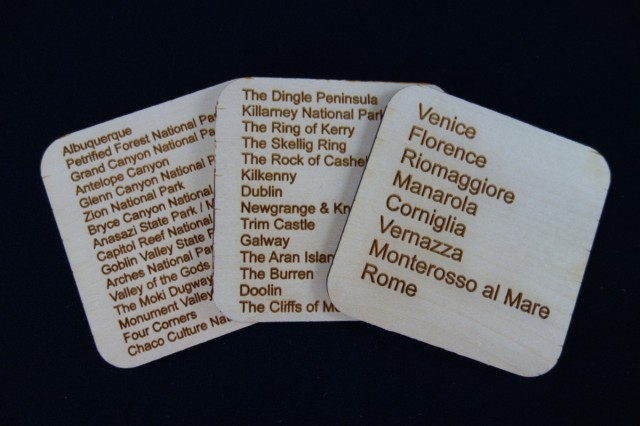
I made quite a few coasters, and above is a photo of three of them. The coaster on top is a rail trip through Italy, the second is a 1000 km, 12 day (right hand) drive through Ireland, and the last is a much longer than 12 day road trip through the southwest – note the vertical and horizontal lines are the state borders of NV/NM/CO/UT.

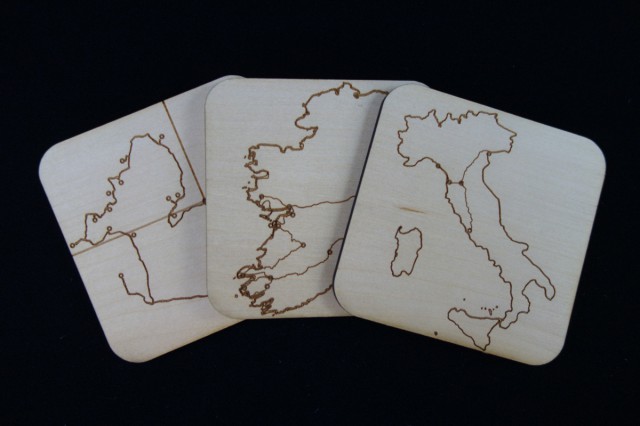
A few days later, after polishing my vector editing skills in Inkscape, I made an improved version of the above three coasters.  I added circles to more clearly highlight each stop, and I etched the names of each stop on the reverse side of each coaster.  One group of raster to vector settings I used in Inkscape resulted in the creation of two sets of (closely spaced) hairlines for the outline of Italy, as shown in the coaster above.  I really liked how distinct the outline of Italy is relative to the path of the trip.  I chose to intentionally create two offset hairlines for the other country or border outlines, using Inkscape’s linked-offset path command.

Check out the new and improved design of the front, with dual country/border outlines and circles to denote the stops:

Three_Coasters_Front_Improved

Check out the reverse sides of these coasters shown below, with names of each stop etched on them. Albuquerque.

Three_Coasters_Back_Improved

Weekend Project: End Table

This weekend I made an end table for my living room.  Its in the style of two night stands I made, this one for the tool at hand contest, and this second one! The legs of this series of small tables are getting increasingly eccentric.  To build it, I started with three pieces of 2×12 lumber, and a 1/2″ diameter dowel rod.  I avoided using metal fasteners, and instead used only wood glue and 8 3″ long dowel pegs to attach the legs to ensure that sculpting the table with my chainsaw-blade-equipped angle grinder would be safe(r).  To save some labor with the grinder, I actually cut some of the zig-zag legs with a band saw first.  Even with the pre-cutting, I ended up making 1.5 cubic feet of wood chips and saw dust.

EndTable

2014 RPM Challenge: Accepted!

Today is the first day the 2014 RPM Challenge, which is the National Novel Writing Month of music!  The goal of the RPM challenge is to compose and record an entire album during the month of February! I accepted the challenge by dusting off my Cacophonator and Mohogonator, and got to work making music after dinner today. As today also marks the 50th anniversary of the Beatles invasion, this project drew inspiration from the Beatles’ back catalog!

RPM_Challenge

I used the dynamic duo of Cacophonator and Mohogonator with Auditionator (i.e. Adobe Audition) to record a session for about 12 minutes at a blazing fast 192kHz sample rate.  After chopping the recording into individual tracks, I digitally slowed them down to the customary rate of 44.1kHz, thereby expanding the work to its final ~45 minute length.  For inspiration while I was recording, I listened to Beatles songs sped up to 435% (which is 192/44.1) of their customary speed.  My tracks needed a bit of post-processing: on some of them I chose to bump the pitch back up an octave or two and add “Beatle Fades” to the beginning and end.  Anyway, within twenty minutes after the recording was made, I had edited the songs and uploaded them.  You’ve read that correctly, in less time than it takes to listen to the pieces, they were composed, recorded, processed, mastered, named and uploaded.

Today is also the 50th anniversary of the first Beatles song hitting #1 on the US pop charts: “I Wanna Hold Your Hand.” This whole project was inspired by this apparent coincidence in timing, and each track was directly inspired by listening to the sped-up Beatles original.  I hope you enjoy each of the 11 tracks I created!

While My Cacophonator Gently Weeps
Got To Get You Into My Cacophonator
All You Need Is Cacophony
With A Little Help From My Cacophonator
Sgt. Cacophonator’s Lonely Hearts Club Band
Cacophonator Came In Through The Bathroom Window
Lucy In The Cacophonator With Diamonds
Got To Get Cacophonator Into My Life
A Hard Day’s Cacophonation
You’ve Got To Hide Your Cacophonator Away
Cacophonator Wants to Hold Your Hand

It may be more convenient to listen to the entire album: “Cacophonator 2: Electric Boogaloo; A Love Tragedy in 11 Parts” on the RPM Challenge site’s Cacophonator page. Just scroll down to “My Player.”  There is plenty of February left: I encourage everyone to participate!

Glass Etching

Bottles

I did a few glass etching classes last month, and the timing was good because people were looking for unique gifts they could make for the holidays, and a personalized etched drinking glass makes a fine gift!

We started out by cutting vinyl on the Silhouette Cameo and then sticking it onto glass bottles. This let everyone get a feel for the sandblaster before they moved on to a real glass.

After everyone used the sandblaster I helped people get their artwork ready, we cut the vinyl, and then everyone etched their glass or mug. (We also got a few lessons on troubleshooting the “temperamental” sandblaster.)

Unfortunately I was too darn busy running the class to take any photos (though Ben did) but I liked what Audrey did, so I pretty much copied her and made my own “Milwaukee Makerspace Racing Team” drinking glass. Here it is!

Glass Etching

Here’s a close-up of the etch. It looks pretty good! The process isn’t too hard, but there are a lot of little details to know along the way. I’m glad I could get people up to speed. (I guess my etching of 300+ items back in October helped!)

Glass Etching

If there’s still interest, I can run another class, but there’s only two people right now who missed it, and I’d like to get a few more people before committing to a full class. (Rumor has it we may also be seeing a sandblaster upgrade soon!)

Further Adventures in CT Scan 3D Ego Printing


After a long series of manipulations, the CT scan derived  face was successfully used to make a pencil holder (of all things!).  It is about 100mm high and took about 9 hours to print.  You can find files that you can use to make your own mash-ups of my face on thingiverse: http://www.thingiverse.com/thing:203856

3 face cup 2