Because wedding insanity is real

When my husband and I started planning our wedding earlier this year, we wanted to make sure we got to spend time with all of our family members who were traveling in from out of town, many from out of state.  It was one of our many reasons for trying to have a small guest list for our intimate wedding.

Oh, and also because the wedding industry is crazy.

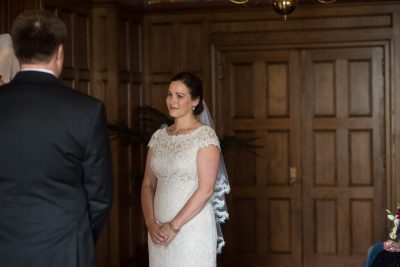
When I saw that the veil I wanted to go with my dress was just as expensive as the dress, I decided it wasn’t that important to me.  I saw a lot of Pinterest boards with DIY wedding veil pictures and tutorials, so I figured I would give it a shot.  If it failed, no big deal.  So, this is the story of my $15 wedding veil.

268_amy_josh_mini

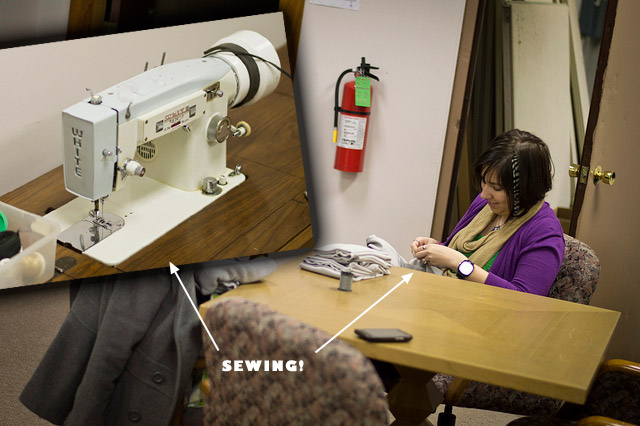
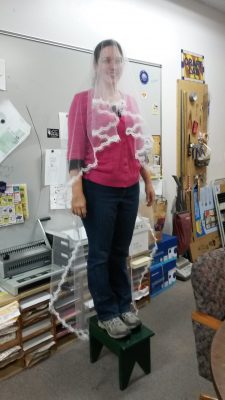
I started with some tulle that was donated to the Makerspace’s Craft Lab, and sorta followed a tutorial online.  The biggest pain was pinning the tulle folded in half, so that when I cut the rounded corners, it was even.  With Karen’s help, I used ol’ string-on-a-peg to make a partial circle cut line, which let the veil fall nicely around my head.

Using invisible thread I sewed the trim lace (bought via Etsy) to the edge of the veil.  If I were doing this again, I’d clean up the lace before sewing it on, but I did it at the end and it turned out okay.

20160714_17105220160714_18272220160714_183306

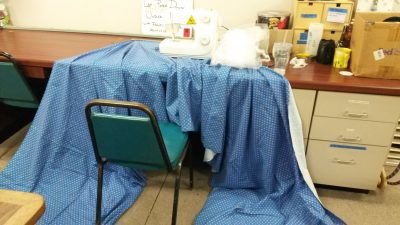
While working, I laid the veil on a very large piece of fleece material, and also folded it up inside the fleece to keep it from sticking together (the eyelashes on the lace liked to cling to the tulle).

20160717_13042720160717_130433


Take THAT, wedding industry people!!

Gothic Arch Room Divider is Finished (Sort of….)

Sanctuary and More 102Silversark put together an amazing fashion show on Friday to showcase pieces she made inspired by church architecture and her trip to the Netherlands. This is something I cooked up for a background piece for the show.

The design work took several months and the actual creation of the piece took about a week, working 12-16 hours a day.  The frame is made from CNC routed aspen (thanks, Jason H.!) which is a rather “fuzzy” wood and required two days to hand finish, including the use of a set of needles files to smooth out the inset edges.

The acrylic panels were hand-stained with Gallery Glass stain and simulated liquid leading. They’re not quite finished yet, but I plan to complete the staining within the next week.

I’ll also be using this as a backdrop for various events including the Sustainability Summit coming up as well as the Concinnity sci-fi/gaming convention on April 5th. Additionally, this might be making its way to Embellishments in the Grand Avenue Mall for a window decoration.

I can’t wait to make another one!

Further Adventures in CT Scan 3D Ego Printing


After a long series of manipulations, the CT scan derived  face was successfully used to make a pencil holder (of all things!).  It is about 100mm high and took about 9 hours to print.  You can find files that you can use to make your own mash-ups of my face on thingiverse: http://www.thingiverse.com/thing:203856

3 face cup 2

Make It Sew!

Make It Sew!

Thanks, Jean-Luc! If you haven’t heard yet, Milwaukee Makerspace now has a craft area, complete with sewing machines and plenty of space to roll out and cut up some fabric. Make It Sew!


Sew

At our old location (which was a bit “industrial”) there was a layer of filth everywhere which pretty much prevented the introduction of clean fabric, but with new members eager to handle the operations of the craft area in our clean new building, we can’t wait to see what gets made.

Shirt

New member Caitlin has already made a new shirt! (She used this pattern, btw.)

There’s another member organizing a regular “Stitch ‘n Stuff” event (details to come) where people can show up and work on their sewing, knitting, crocheting, and costuming projects.

At some point I’m sure the sewing people will run into the electronics people, and someone will pull out the conductive thread, and then the next thing you know, e-textiles will appear. (We have it on good authority that’s how these things usually work.)

(Did I mention the screen printing? No, I didn’t, but we’ll save that for another post!)

Easy Star Trek “Red Shirt” Costume

I always have the best of intentions. When getting invited to a costume party, I plan to put lots of time and effort into it to create an EPIC costume. Time after time, I put it off and come up with something at the last minute.

The great thing about a costume is that you DON’T have to spend lots of money on one. In fact, you can create a very good costume, just from clothing and props you already had.

Recently, a friend had been working on a Star Trek prop, which got me thinking about how simple a Star Fleet uniform would be to make. Not a perfect one full of detail, but something fun, simple, and cheap.

To start, I gathered together a red T-shirt, black pants and shoes. I didn’t have a long-sleeved shirt, so I just layered the red short-sleeved over a black long-sleeved T-shirt.

A Federation insignia or communicator badge is an important element to the costume, but is simple to make. I just went to the web and did an image search. When I found one I liked, I downloaded it, scaled to to about 2.5″ tall in my graphics software, and then printed it onto tag-board with my inkjet printer. I cut out the insignia, and put a piece of tape on back. A safety pin glued to the back would work great as well. From just a few feet away, it doesn’t look like paper at all, it just looks like the logo you expect to see on the uniform.

Of course no Star Fleet Officer on an away mission would be without a phaser. I had several to pick from: a TV remote, an infrared thermometer, or my cordless beard trimmer. Basically any dark plastic item that you can point threateningly can be a phaser. I chose a digital tire pressure gauge as my hand-weapon of choice.

Also handy would be a tri-corder. I DID spend a bit of money on this one – $.99 cents. Since I happened to have a smart phone, I downloaded a tri-corder app. It has lots of blinking lights and sound effects that add considerably to the outfit.

I also wanted to point out that I was NOT a main character. Nope, not Kirk or Picard or any of those guys – just a nameless red shirt that’s guaranteed to get killed by the alien/monster of the week. To do so, I created a “Hi, my name is:” badge from a computer-printable address label and a marker. I tried both “Red Shirt” and “Expendable” as name-tags. At the one costume party I went to, people got the joke and had a good chuckle – and then had an urge to kill me…. (Lion-O quickly took me out with the Sword of Omens.)

So, remember, a costume doesn’t have to cost a fortune in time and money – just recycle some clothes and other items into a simple and clever outfit anyone can appreciate.

-Ben