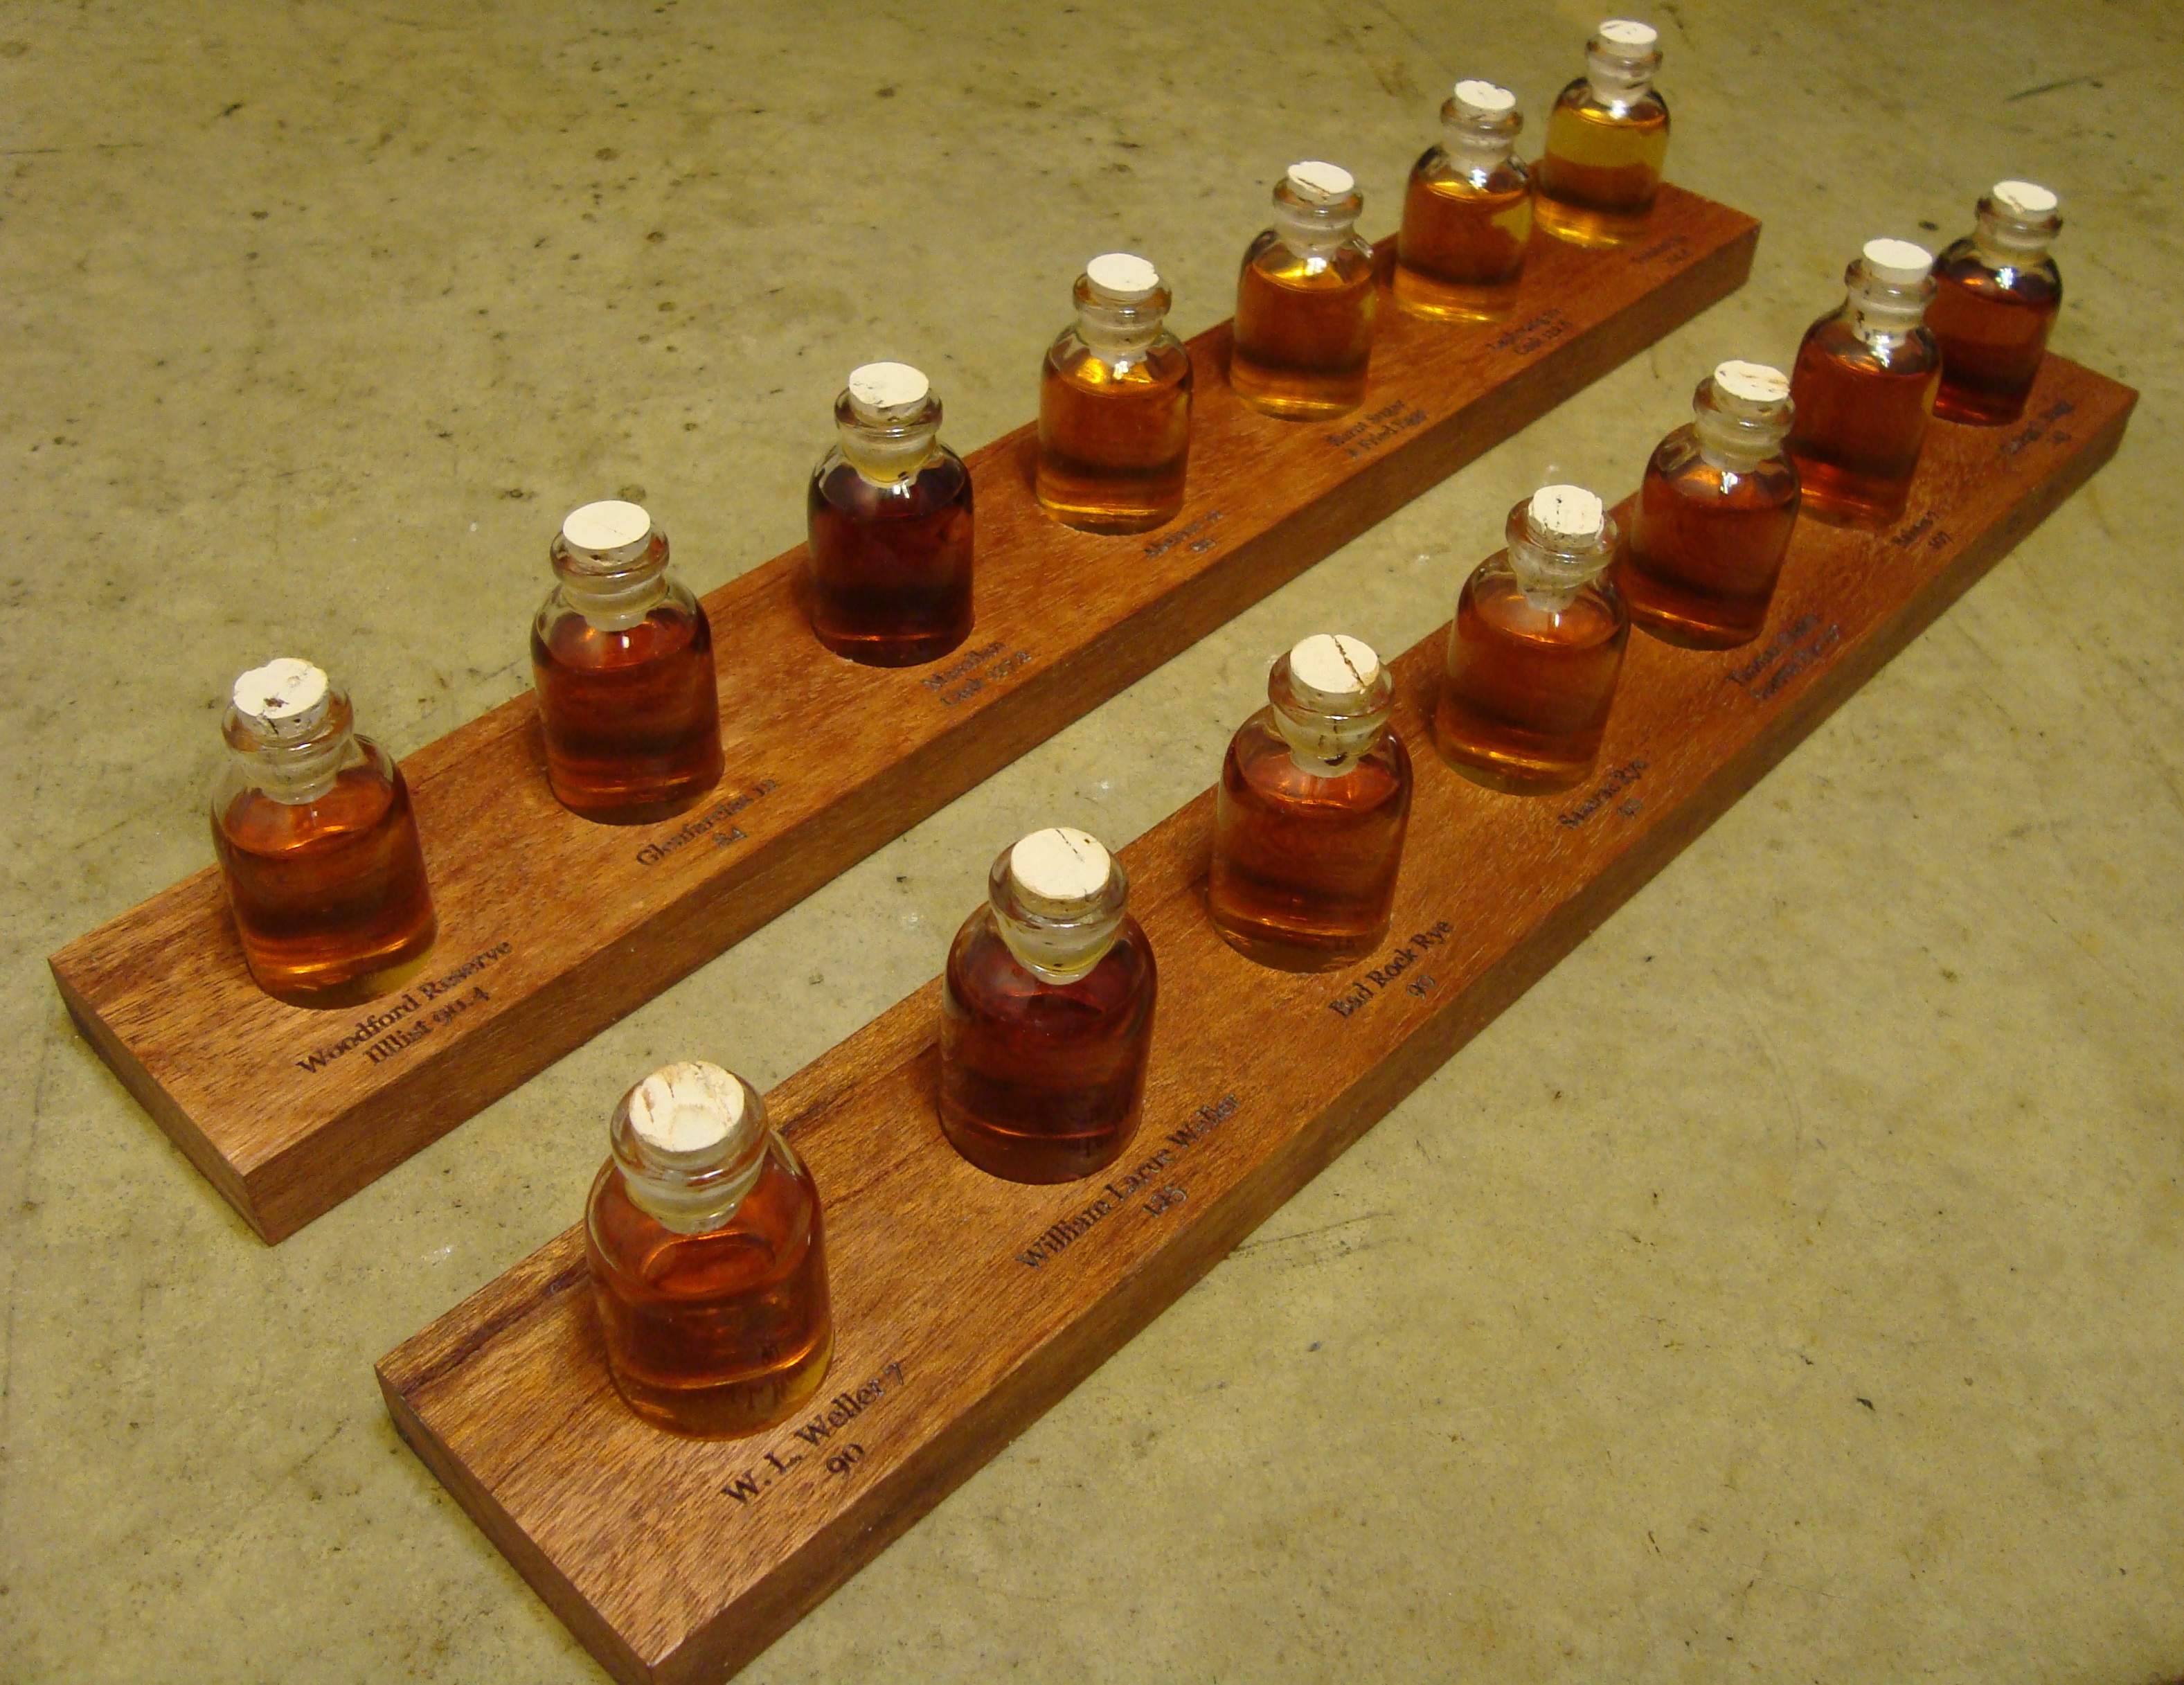
One of our members got married yesterday, and I crafted a fine gift for him and his wife at the Makerspace. The happy couple enjoys whisky, and I thought that providing a tour might be a nice idea. The tour starts at inexpensive bourbon, moves through wheated whiskies, and on to rye. The tour continues in Scotland with some easy to enjoy Sherry cask finish bottlings, and then moves on to rare, Islay and finally mature bottlings (25 Year old Talisker!).
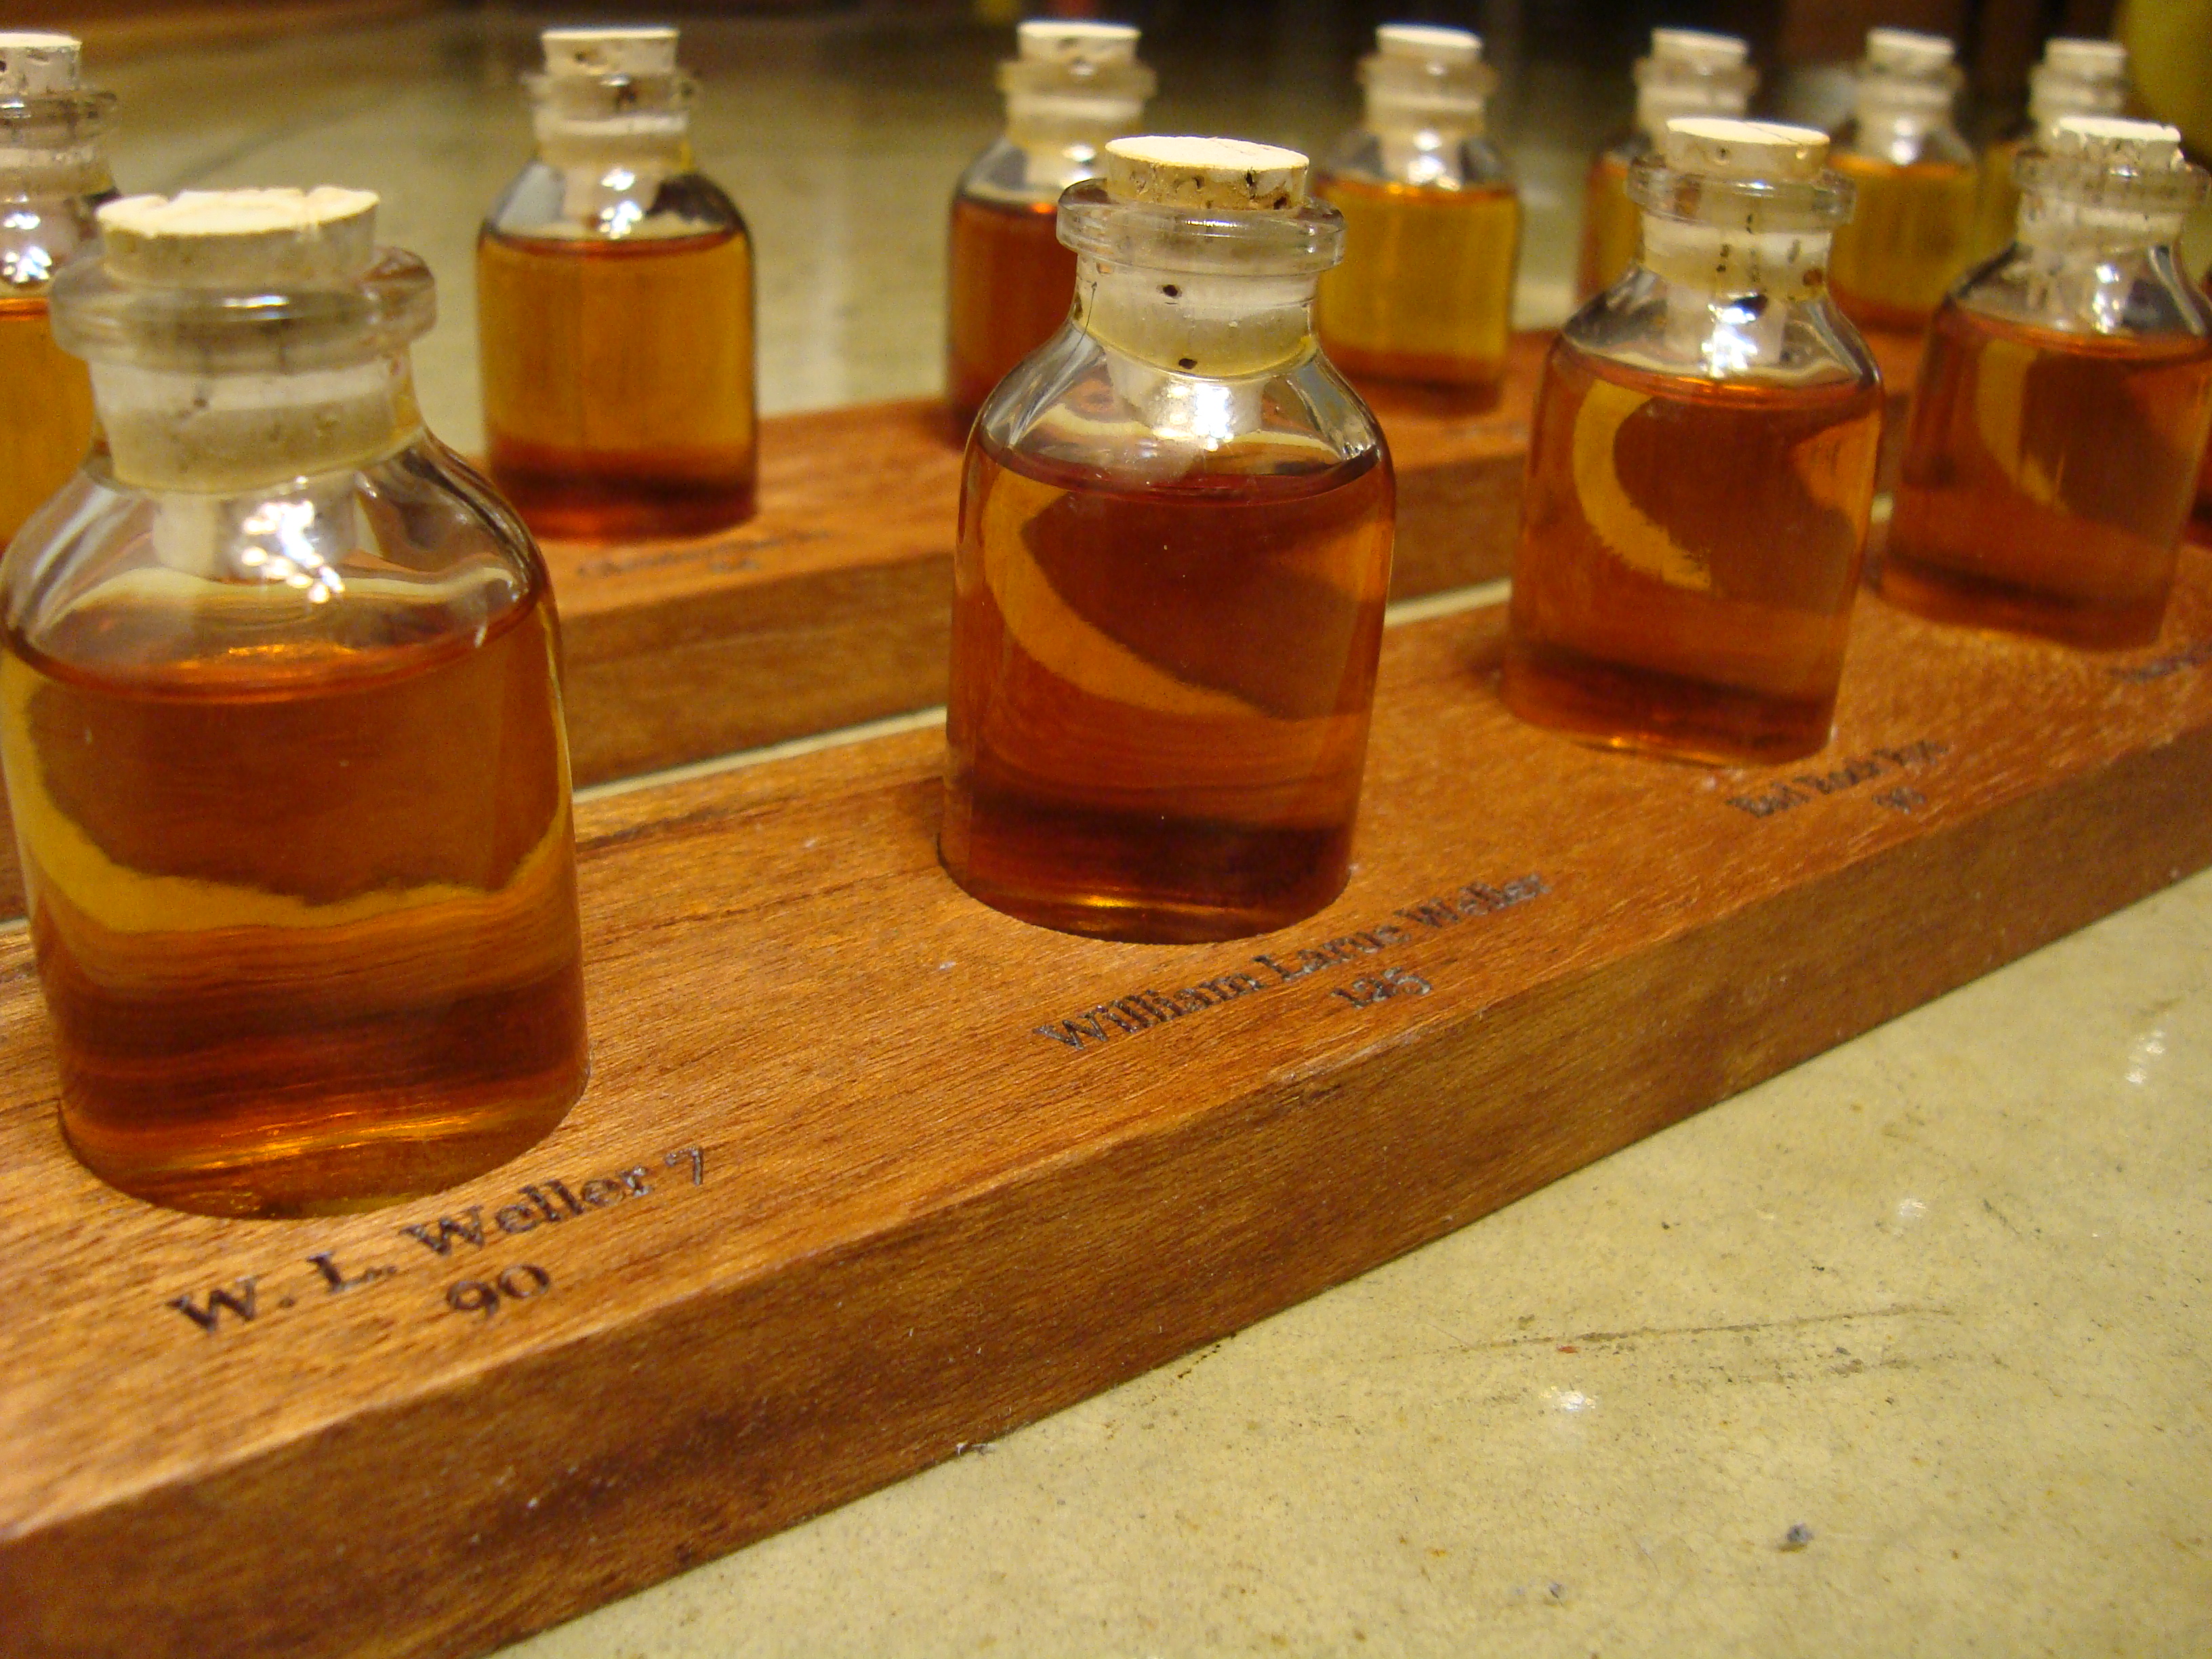
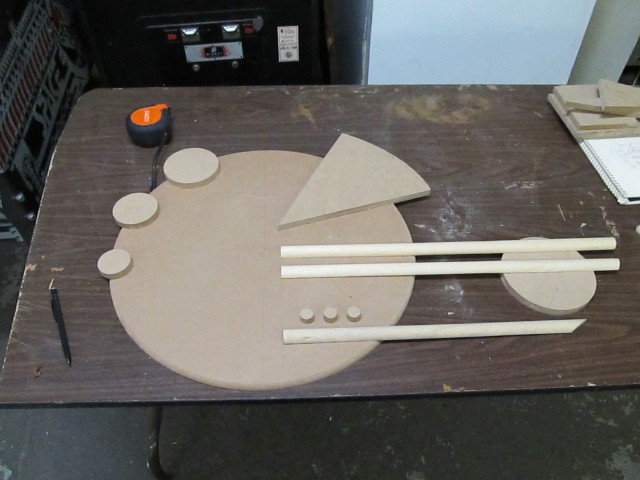
I found some old mohogany baseboard that had some aging varnish on one side and some old caulking on another. After cutting two 18″ long sections, a few minutes of belt-sanding had them looking great. I used a 1 1/4″ Forstner drill bit to bore 0.3″ deep pockets for the bottles to fit in. I used one of our two laser cutters to etch the name/age/proof of each of the whisky sample on top, plus a congratulatory message on the reverse side. To bring out the rich orangy-red mahogany color, I wiped on Beeswax / Mineral Oil . Check it out close up, while imagining the symbolism of things getting better with age!
So how exactly DO you make an 18-month-old girl happy? Well, it doesn’t take any money or a trip to Wal-Mart. In fact, some rope and an old 5-gallon bucket are more than enough for a fun springtime afternoon!
Last weekend, my wife, young daughter and I went over to my parent’s house. My Dad had recently been over to the store to get chicken wire for the next chicken coop he’s working on, and looked at some playground equipment while there. (They have EVERYTHING at the farm store!) He mentioned how the toddler swing-set they had seemed “too-safe”. That is that it was all blow-molded plastic, had straps and safety belts in all directions, and looked like it would take longer to get the child in and out of the swing then she would actually spend playing in it!
It seemed like it would be simpler just to build something ourselves. We had a 5-gallon bucket and some rope, along with a drill and a jig-saw. Thus, the 5-GALLON BUCKET SWING was born!
Construction was pretty simple. We just pulled off the bucket handle, and then cut two “mouse-holes” for the legs in the front of the bucket. Matching cut-outs were made in the BOTTOM of the bucket, because toddlers legs are so short. We cut down the total height of the bucket, and made it swoop very low in front, high on the two sides, low again, and then high for a back-rest. Four holes were drilled (3/4″) to pass the rope through. Rope goes down from the top, loops through the holes, then back up and out the other side. That way, we only needed one piece of rope, instead of two, and it makes it a little easier to adjust for height.
We didn’t even have a good tree to hang the swing on, but there were two great pines (which provide shade.) We ran a length of sturdy steel pipe between the trees as a cross-member to hang the swing from. Once tied in place, the swing was ready to go.
She swung on it for nearly an hour and a half – this from a little girl who usually spends no more than ten minutes on the swing at the public park. Unfortunately, I didn’t have my camera with me, nor could I really document building the swing, as we were making it up as we went. However, my brother had his cell-phone camera with and grabbed a pair of photos of the first use of the swing.
Being made from plastic, the bucket swing is weather resistant and should last a long time. It wasn’t made in China. It didn’t have any packaging, and it was plenty of fun to make and use. Not bad for a weekend afternoon.
But what’s that? YOU want to make your own 5-gallon bucket swing? Sounds great! Go for it. Here’s some general directions for you.
First, get a bucket. You probably already have one around, but if not, you can buy one at the home improvement store. Better yet, just ask for one at your favorite local restaurant. Pickles and all sorts of industrial-sized food goods often come in 5-gallon buckets.
Next, remove the handle.
You don’t HAVE to take it off, but it will just get in your way otherwise while you are working on the project. Look where the handle connects to the bucket and you will be able to see which way you have to bend the handle to be able to just pull it out by hand.
Next step is to cut a pair of “mouse-holes” for the child’s legs. In these photos, I’m using a black marker to show where I’ll being cutting. When you do this, either cut around the OUTSIDE of your black markings, so there’s no marks done on your finished swing, or just eye-ball it. The leg holes are cut in both the front AND the bottom of the bucket, so the child’s thighs sit on the bottom of the bucket, but from the knee on down hangs straight downward through the bucket.
You can cut the bucket with almost anything, a handsaw, a Dremel tool, a jigsaw, or reciprocating saw. I think a jigsaw is the easiest and most straight-forward for this.
Try to make all the cuts on the project nice swooping curves. Once all the cuts are made, you can sand the edges as well.
Next thing to do is mark the lines for the main cut. Essentially, you are cutting really low across the front, above the leg holes, and then high on either side, near where the bucket handle originally connect, swoop low again for where the kid’s armpits are going to be, and high on the back for a back-rest. That may sound complicated, but a couple pictures are worth a few thousand words.
You’ll also need to drill four holes. Two are the main “hanging holes” which will be located directly below the original bailing handle connection points. The other two are roughly below where the child’s armpits will be, and allow for the rope to go through to the back of the swing, around the outside of the bucket. That way, the rope acts as part of the back-rest, and prevents backward tipping, but is not between the child and the back-rest. You probably want to drill the holes BEFORE cutting the bucket in half, as it will have more strength and is easier to handle in its original bucket form.
Once those holes are drilled, cut that swooping line to make the bucket into two halves.
Frankly, I’m not sure what to do with the top half of the bucket that got cut off. If you have a good idea of how to make use of this “waste”, please let me know!
By now, the bottom half of the bucket should be starting to look like something you might see at the park.
Next, get yourself some rope that’s at least twice as long from your favorite tree-branch to the ground. Thread one end of the rope DOWN through the outside of one of the ears, out through the next hole, around the outside of the back-rest, back IN the next hole, the up and out the other ear. Again, it makes more sense if you look at the photos.
Also, please note that on this particular bucket swing, the back-rest is a little low. It should really come up nearly as tall as the side ears. When we worked on the first one at my Dad’s the little girl was right there. She cooperated well in that she was happy to sit in the bucket while we marked the positions and distances of the various parts of the swing. (The little girl was not around while I was working on this particular bucket. I highly suggest using your toddler as a template for your project!)
Next, you just have to hang it. Tie one end of the rope to the tree branch. Make sure the swing is facing the direction you would like it to face. Slide the swing on the rope until it is at the height you would like it to be at. That’s usually between the height of an adult’s waist and knee – a good pushing height once the swing is drawn back.
Most likely, you will want to use an outdoor-rated, UV-resistant, artificial fiber rope. Otherwise, you could also chain or cable, but rope is simple, easy to work with, and doesn’t pinch little fingers.
The proof is in the pudding. After checking that the swing is tied securely, at the right height and level, put your little darling in there and give him or her a push!
If all has gone well, you have a smiling child swinging away on your aren’t-you-proud-you-made-it-yourself swing-set!
Once the tot is in there, you might want to confirm that the leg holes are the right size, and that there’s no chafing or rubbing. In the photo above, it looks like the left leg hole (her right leg) could be a little bigger.
If you, like me, enjoy irony, you might want to design your bucket so that it keeps the “THIS IS NOT A TOY” warning on the side.
Here’s a couple of views of the back. In these photos her shirt is covering part of the back-rest, but it’s still a little low. In the next bucket swing, I am going to make sure the back-rest is higher, nearly as tall as the side ears. Make sure that there are still the downward swoops for the armpit area. This allows the child to have comfortable arm position, NOT rubbing on the bucket, and still easily reaching up to grab the rope.
That’s about it! It’s a simple project, inexpensive, fun to make, and fun for the kids to use!
Here’s a video quickly showing all the steps as well!
Do you have any ideas for improving this design? Have you made one? Let me know! Leave a comment or post a photo!
One last treat for you – I created a one-page PDF file for you that has step-by-step directions for how to build the swing. Click the link , then print out the file and take it to your workshop with you!
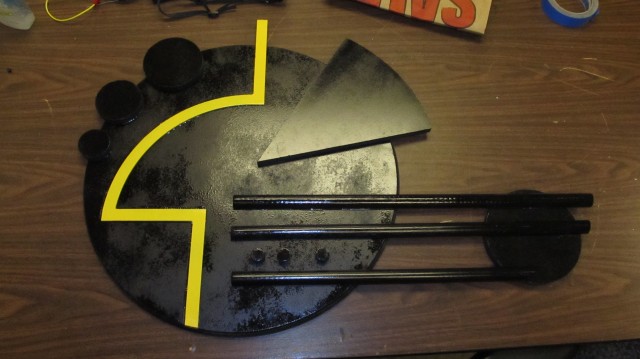
I sketch quite a bit and I’ve been doodling things like this for years without realizing that, technically, they fall under the “Art Deco” category. If I were content with that, I’d paint it blue, pink, and silver. However, because cerulean blue belongs in the sky and not on your wall, pink belongs in distant sunsets and not on your wall, and why the hell would you paint wood silver? I decided that to bring this piece into the 21st century I’d need to radically rethink the colors.
At first, I had intended to only paint 3 elements of the composition. After picturing it in my mind, I decided on the single yellow piece that you see here. I’m quite pleased with the end result. Unfortunately, the spray-acrylic sealer that I used was very old and I suspect that it was this that led to the strange patina you see on the main circle here. No matter what I tried, I kept getting glossy parts and flat parts.
The primary material is MDF, some of which was cut with our very own CNC router, with hardboard being used for the yellow part, and split pine dowels (thanks to my own rig, clamped to our band-saw) for the 3 extending pieces.
*Note: When cutting a perfectly cylindrical piece length-wise on a band-saw, the piece will have a tendency to rotate as you’re cutting. I’d have done a better job had I thought to clamp the piece to the jig that I set up.
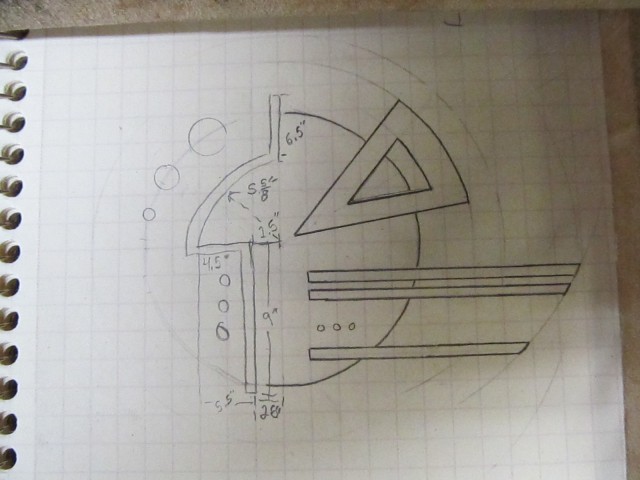
This is the rough sketch of what I had planned on making. Things change in a wonderfully organic way when you go from sketch to completed project.
The piece before painting and assembly.
I laid the pieces out separately and hit them with flat-black spray paint. This took very well to the MDF. After painting and clear-coating everything, I waffled about how to assemble the many into the whole. I first toyed with the notion of pre-drilling, then screwing everything in from the backside of the piece; I also realized what a pain it would be to try to locate each hole without being able to see the front first.
Next, I thought I’d use a brad-nailer and just pop everything in, but ours doesn’t take anything shorter than 5/8″ and this entire project is just under 1/2″ in depth and I didn’t want to bother cutting the ends of the brads flush with the back, plus, they could scratch the wall that it hangs on.
I finally decided on some epoxy that one of our makers had brought in. It’s proven very workable and durable, as I found out when I used it to make the spools for our Makerbot ABS plastic filament. I put several pieces on at a time, weighting them down with some paving bricks (covered in cloth, as I didn’t wish to scratch the paint). After letting it cure for 24 hours, the project was more-or-less done.
All that’s left is to figure out how to mount it to a wall. I think I might use a plunge router and hollow out a portion of the back for that. Another idea has been brewing in the back of my mind, but it’s too cool to mention unless I actually do it. Rest assured, if I use that idea, I’ll be posting about it here and on Instructables.
UPDATE: I found that it’s about the same weight as a moderately sized picture, so I picked up some picture-wire and attached it via two screws in the back. It is now hanging on my bedroom wall.
On June 18th, Milwaukee Makerspace participated in The Great Milwaukee Race as a challenge sponsor.
The Great Milwaukee Race is a scavenger hunt/series of challenges across downtown Milwaukee that was started in 2010 by Fit Milwaukee and friends. This year’s event was put on by Fit Milwaukee, AJ Bombers and Performance Running Outfitters. In 2010, 50 teams of 2-4 racers competed in the inaugural race. This year 75 teams raced throughout downtown Milwaukee and along the lakefront to find all 10 of the challenge locations and get their passports stamped.
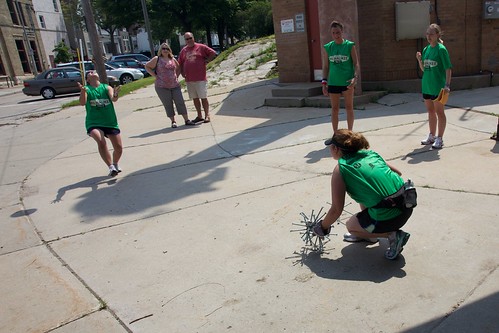
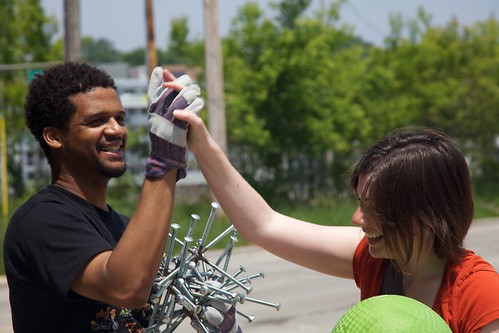
The post i made a couple weeks ago (I’m welding! I’m a welder now!) about my Ridiculously Large Jacks was a preview of the challenge that we would run at the race. After the initial batch of jacks was finished, Sean, Kevin, Adam and David helped me fine tune the game a bit in our hangar before the event itself.
Shane helped me run the event on race day and it worked like this:
Team would decode the clue to our location and decide on when they should come to our station.
When they showed up, they had to nominate two players.
One player was the bouncer and was in charge of bouncing and catching a kickball.
The other player (the grabber) donned a pair of gardening gloves and had to pick up the jacks.
On the first bounce, the grabber would have to pick up and hold onto one jack before the bouncer caught the ball.
On the second bounce, the grabber would have to pick up 2 more jacks while holding onto the previous jacks.
Repeat for 3 and 4 jacks.
The game only took a couple of minutes when done correctly, but some teams were faster than others. We also saw a variety of techniques. Some grabbers would try to stash the nearly 12″ diameter jacks under their arms. Some folks spread the jacks out between their hands and used them like claws to scoop up the remaining jacks. One women even stashed the jacks in her running shorts, but they were a bit heavier than she bargained for.
We were stationed at the underpass at water and pearson, across from Trocadero. After watching what was happening for a while, the Trocadero bartenders popped out to see what was happening up close. We invited them to play a game and they did pretty well! Another couple came by to watch and started laughing at the silliness they saw so we invited them to play as well. They had a few close calls with some wild bounces, but took care of the round with only a couple of do-overs. They looked pretty happy by the end of the game.
We heard really good feedback from racers and the organizers of the event. The game was odd enough to give people pause before they jumped in, but easy enough that it could be completed in a couple of minutes. The fun we had with this has led us to discuss making some more oversized games to bring to parks in the area. Stay tuned for more info on this front.
Thanks again to Fit Milwaukee and the other Great Milwaukee Race organizers for letting us be a part of this event and thanks to the racers for being such good sports!