Bullet-Proof Coffee Table

awesome beer angled two tone DSC_6274

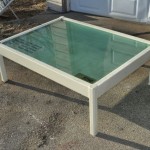
This weekend, I built a bullet-proof coffee table.

For years, I’ve had a three-foot by four-foot piece of bullet-proof glass that I removed from a bank while working construction there. I saved the glass, thinking that it would make an AWESOME table. Well, I finally got around to building it.

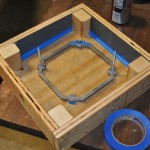
I cut pallet-racking cross-pieces to build a frame that would wrap around the glass. Pallet racks already have a 1.5″ indent in them to hold lumber, which was perfect for a supporting lip for the glass.

The legs were two-inch steel square tube, cut to 18″ long. After cutting the pieces, I tack welded the whole frame together, checked for square, and tested it against the glass. I then did all the welds, capped off the ends of the legs, and ground round the top corners.

After that, it was a coat of primer, a coat of 1980’s bank industrial beige paint, and laying the glass into the frame.

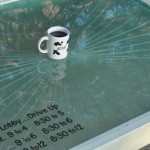
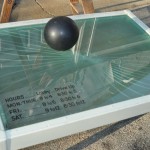
I still wanted to test how bullet-proof it was, but simply, and safer than with a gun. I did have a bowling ball handy! Check out the video for how I made an interesting pattern in the glass!

After I marked the glass, I thought it would look really cool backlit! Once it was dark, I put a temporary light behind the glass, and was very pleased with the results. The cracks light up great! I’ll now have to permanently wire up some lighting under it.

I have a full DIY build write-up on it at Instructables. In fact, it’s in the INDESTRUCTIBLE contest there, and I’d love to get your vote!

Oh, and can anyone stop over and help me move this table? It weighs a TON!

DSC_6165 DSC_6223 DSC_6196 awesome beer angled two tone DSC_6274

Iron Hooks from old Nails

Recently, I’ve started playing around a bit with metal-working. Pretty low-tech stuff – heat it and beat it.

My DIY coal forge isn’t much to look at, just a couple pieces of steel pipe with the shop-vac on a dimmer switch, and an old brake disc welded on top, but it’s enough to do some basic blacksmithing.

Last night after work, I fired up the mini-forge and worked on a pair of old iron nails. I heated them, and then applied a blacksmith twist, a bend to make a hook, and even hot-punched (NOT drilled) mounting holes.

Once done, I hit them with a wire wheel to give it that shiny silver-and-black finish I like.

The result is a pair of decorative, yet very functional, iron hooks for hanging decorations, photos, and the like. Maybe I can make a few more to mount next to my wood stove to hold my fire poker and kindling hatchet.

Hot Stuff! Aluminum Pour Night.


To quote the Iron Worker on THE SIMPSONS,  “Hot stuff, coming through!”
I was pretty excited that I finally made it down to the Milwaukee Makerspace last night to attend an aluminum pour! I’ve seen a couple of the videos and really wanted to get in on some of that hot metal casting. I have what’s called a “speed-ring”, a metal ring that holds a soft-box for photographic lighting, and I wanted to make a copy of it.

So far, much of the casting has been using a “lost-styrofoam” method. A shape is carved from foam and set in sand, and the aluminum melts the foam as it’s poured in. But I wanted a COPY of an existing item. I asked Bret about it, and he said we could try an experiment of pretty much just pressing the ring down into some sand. An X channel was then added in the middle as a point for the aluminum to pour into and spread out into the shape.

I built a wood box for my item, and we filled it with oily sand, packed it in there, and added the X-trough. My item didn’t pull out of the sand quite as well as I had hoped, but hey, it’s an experiment…

Outside, the aluminum furnace was roaring away, heating aluminum to a delightful orange liquid. The first pour made it through Kevin’s FEAR art piece, my piece, and another members. Later, a second pour took care of Phil’s hand-casting series (which turned out great!)  and the rest went into an ingot mold.

Once my piece was cool enough, we pulled it out to take a look at the results. Not perfect, but not bad for a first time, and an experimental casting at that. There was quite a bit of extra metal, but most of that could be easily trimmed off with the bandsaw. Other members were taking photos of their work. It was obvious that everyone was pretty proud of their individual castings. Even without being the one pouring out twenty pounds of molten metal, it was still a pretty macho experience just to be part of.

If you too want to come play with crazy hot metal, come on down to the Makerspace next time we do an aluminum pour!

Makerspace Aluminum Casting Foundry

I arrived at the Makerspace on Thursday without an idea of what I would cast in metal, and in less than two hours I was removing my piece from the steaming petrobond! Check out the fruit of two hours of labor cast in metal!

That’s right! The Milwaukee Makerspace had its first (and second) aluminum pour on Thursday! Thanks to the hard work of several members, the Makerspace now has a fully functional aluminum casting foundry.  The custom built propane and diesel powered furnace melted an entire #16 crucible of aluminum in less than 20 minutes.  Check out Brant’s video to see our fearless foundry foreman leading the two pours!

To get the foundry running quickly, we’ve started out by using a lost-styrofoam casting method.  That is, styrofoam is carved into the desired shape and then a sprue and vents are attached with hot glue(!).  This assembly is placed in a wooden form, and is surrounded by tightly packed petrobond, an oil bonded, reusable sand.   Then, the molten aluminum is poured directly onto the styrofoam sprue.  The styrofoam is instantly vaporized by the 1250 degree Fahrenheit aluminum, which fills the void in the petrobond formerly occupied by the styrofoam. The air and perhaps even some of the styrofoam residue escapes from the mold through the vents.  We’ll be phasing in bonded sand and lost wax casting soon, so stay tuned for those details.

Eventually we’ll be having aluminum casting classes; however, we’re definitely going to be having aluminum pours on alternate Thursday evenings for the next few months.  Join our mailing list / google group to get more details.  Metal pours are spectacular to watch, so feel free to stop by to see the action around 7 or 8 pm, or join the Makerspace and participate!

Metal Signage

Milwaukee Makerspace

One of our members, who I’ll refer to as a “Master of Metal” made this fully-functional sign for one of our doors. Never again will someone attempt to enter said door without knowing who (and what) lies on the other side.

And when I say this sign is “fully-functional” I mean it is fully-functional. Enough said.