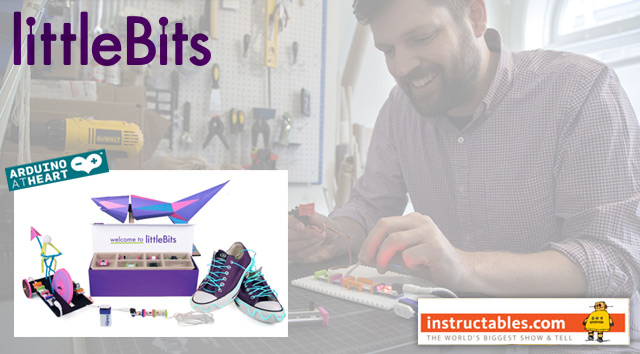
Have you heard of littleBits? It’s an open source library of electronic modules that snap together with tiny magnets for prototyping, learning, and fun. If you’re the kind of maker who tends to avoid the Electronics Lab, littleBits might be just what you need to start experimenting with circuits.
We’ll be hosting a number of littleBits Build Nights in June, sponsored by our friends at Instructables, who have provided us with a bunch of littleBits Deluxe Kits, as well as a number of their new Arduino at Heart modules, which let you add an Arduino brain to your littleBits creations.
If you come up with something cool, we’ll help you post a step-by-step Instructable for it, so others can enjoy your creation. If you need some inspiration, check out some of these littleBits projects.
These events will be free, just bring yourself (and your ideas!) to 2555 S. Lenox St. in Bay View and make something cool with littleBits.
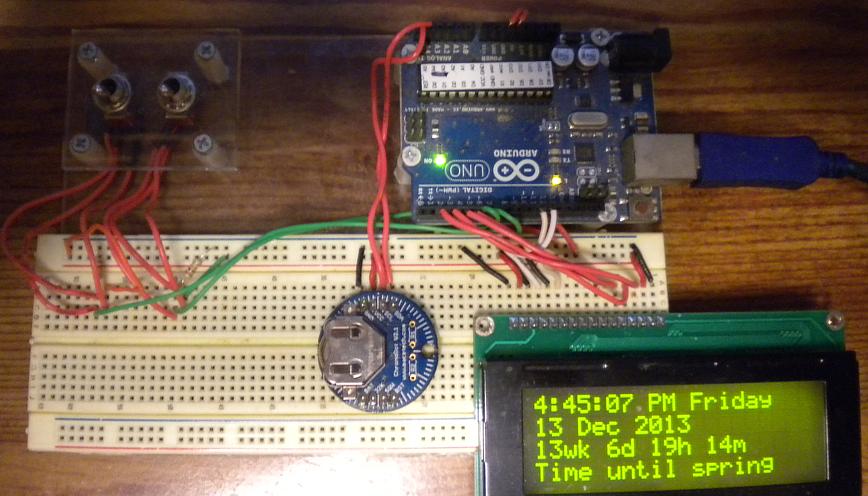
I made a few RTC / LCD clocks and disliked setting the time using an Epoch converter so I found a solution that uses 2 buttons to advance the Hours and Minutes. I substituted toggle switches for the buttons because I didn’t want to have to hold down the button while the Minutes were advancing, thus enabling me to move on to determining how long it is until Spring!.
About 3 months ago, in caffeine fueled bravado, two of my friends and I decided to try to build an aquaponics farm in Botswana, a country in Southern Africa. After a lot of reading, field trips to a few impressive facilities, and a trip to Africa, where we secured a partnership with a local institution, we wisely decided to build a system locally first.
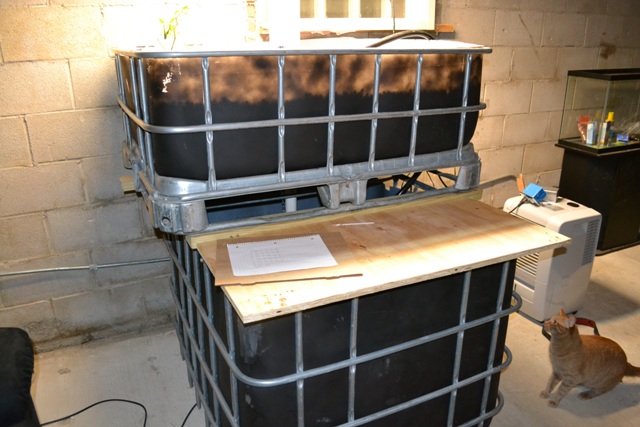
Aquaponics is a mixture of hydroponics (soil-less agriculture) and fish aquaculture (hence the cat’s laser-like focus). It is a symbiotic process, where the fish’s organic waste fertilizes the plants, and in return are supplied with filtered water. The only system input is fish food.
The two (2) black plastic boxes pictured above used to be one (1) 330 gallon IBC tote, which are usually used to store and transport fluid and other bulk materials. We cut the container about cut about two-thirds of the way up. The larger bottom tank holds 40 yellow perch for now – it can support about 80-90 fish. Water from the fish tank is pumped through the black pipe in 10 minute on/off cycles to the grow bed above. An Arduino housed in the blue box to the right controls the pump and also monitors water temperature. We plan on adding sensors to monitor the water chemistry (pH, nitrates, etc.) in the future.
The grow bed is media based. In other words, we use a mixture of rocks and expanded clay (the red stuff) to support the plant’s roots and act as a bio-filter to filter the water and convert fish waste (ammonia and nitrites) into plant food (nitrates). The filtered water falls back to fish tank through the PVC pipe (there are several small holes under the rock), which introduces oxygen via percolation and completes the mostly closed-looped cycle. A set of six (6) full spectrum T5 lamps provide the artificial light. The first crop of tomatoes, radishes, pepper, lettuce, and some wicked cucumbers is sprouting in the plastic containers and should be planted within the media within a day or two. We are expecting the first harvest in 4-6 months.
So now that we are seasoned farmers, we have launched a campaign to build a larger, floating-raft system in Botswana at a local institute of agriculture. We are currently in the fund raising phase on indiegogo. If everything falls into place, we will start construction in late summer (winter over there) of next year.
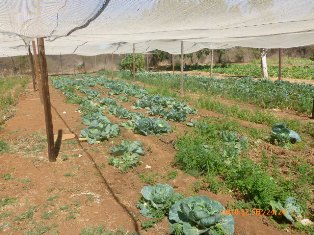
Pictured below is the reason we are pursuing this project. It hasn’t rained there since 2009. Combine that with the poor soil and the country has to import almost 100% of its vegetables and most fruits. We are hoping that water and energy efficient aquaponics based farming that produces hormone and chemical fertilizer free fish and plants is the answer.
Tracey, my wife, runs a lot. This year she is already over 2000 miles logged. She runs marathons and ultra-marathons and crazy things like 50 mile runs. We have long joked together that she clocks more miles running in a year than i put on my beloved 1999 Chevy Prism driving it to the train station and back. This made me think that i should make an odometer for her. I decided to do this for real a couple of weeks ago and had a prototype ready for her to open on Christmas morning.
Her immediate reaction? “You got me a box of wires and stuff?!” Once i explained it to her and showed it in action, she thought it was a lot of fun.
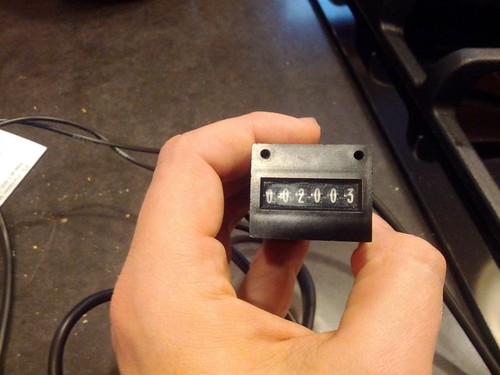
I initially wanted to use a real car odometer, but i didn’t have one handy. I went over to the fantastic American Science and Surplus and looked for some counters or an odometer there. While i didn’t find an odometer, they did have some 24v industrial counters from Durant. These are nice little counters that were (are?) made in Watertown, WI, not too far from our space. They are super simple devices. 6 geared dials have the numbers 0-9 on them. A solenoid ticks the rightmost number with each pulse of voltage it receives. When the dial on the right rolls over from 9 to 0, the next gear is ticked up by one and so on. These counters are not resettable or reversible, except by some manual intervention. I took the little guy apart and cranked the wheels over to where i wanted them.
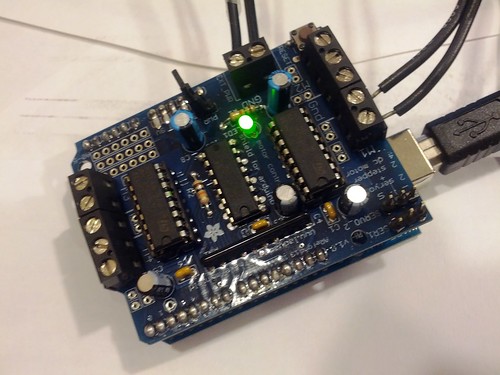
A quick rummage through the hack rack turned up an 18V wall wart that we clipped the plug off of and used for our power source. Royce helped me out with this and with his help and a couple of alligator clips we proved that the 18V was enough to activate the solenoid and tick the counter up by 1. This particular counter moves 1 tick regardless of how long the voltage is applied. To crank up multiple ticks, i need to cycle the power on and off. I had an Adafruit MotorShield lying around that had all of the necessary high-voltage gear on it and we got the device up and running pretty quickly with it. I did not have time to build a circuit board just for this device, so the MotorShield is what is being used for the working device now. That wrapped up a quick night of experimentation at the space and at the end of it i had a working counter and the Arduino code to control it!
My next task was to integrate it with DailyMile, the social networking site that Tracey uses to log her runs and connect with her running friends locally and around the country. Thankfully, DailyMile has a nice little REST+JSON API that made it super easy to snag all of Tracey’s details. I used their ruby client, but will probably switch my app over to Python because i have been doing more Python development lately. The API returns a simple JSON structure for all logged activities and i simply snag that data and store it locally in a pretty-printed JSON file. A sample activity record and URL look like this:
{"entries":[

  {"id":10441284,

   "url":"http://www.dailymile.com/entries/10441284",

   "at":"2011-10-16T14:34:34Z",

   "message":"My legs felt a little bit tired today but my lungs felt GOOD! I tried to stay relaxed and just enjoyed the feeling of breathing in and out. Really, a lovely Sunday morning.",

   "comments":[...],

   "likes":[],

   "geo":{

     "type":"Point",

     "coordinates":["-87.8961323","42.9935854"]},

   "location":{"name":"Milwaukee, WI"},

   "user":{

     "username":"tmgessner",

     "display_name":"Tracey G.",

     "photo_url":"http://s1.dmimg.com/pictures/users/9744/1322699474_avatar.jpg",

     "url":"http://www.dailymile.com/people/tmgessner"

   },

   "workout":{

     "activity_type":"Running",

     "distance":{

       "value":7.1079,

       "units":"miles"

   },

   "felt":"good","duration":3968}},

   ...

]}
I save all of the activity events locally, but for this odometer, i am only interested in the “Running” events.
The ruby application runs forever and polls the DailyMile API every minute for new data and stops paging through the results if it finds entries that it has seen before. If any new runs are found, the app figures out how many miles are missing from the odometer and sends that value along as a byte to the arduino over the serial port using the serialport gem and waits for a successful response.
The device and code work right now, but the presentation leaves a lot to be desired, though, so i am working on a version with a more lovely display. I like the analog odometer feel and I think the next step will be to make some larger gears for this project on the CNC router at the space and build a bigger version. I’d also like to work with my father on a nice wooden case for the display and the gear.
The more immediate next steps will be to make a smaller circuit for this that doesn’t need a full arduino and a motor shield. I can control the solenoid with a transistor (like we did for the Beer Project). The bigger challenge will be to make the connectivity to the data from the API more compact. I would love for this device to be wireless, but i need to figure out how much i want it to cost. This would be a fun project to offer as a kit or for sale, but i don’t want it to cost close to 100 dollars, so i’ll be doing some more prototyping to make it a bit more standalone. The other challenge i have is that Tracey typically only uses her laptop, so there is no desktop machine sitting around that she would hook this up to so it will constantly update. I do have some new Xbee gear that might work, but i think the trickiest thing to design will be the standalone version that doesn’t need a computer connected to it.