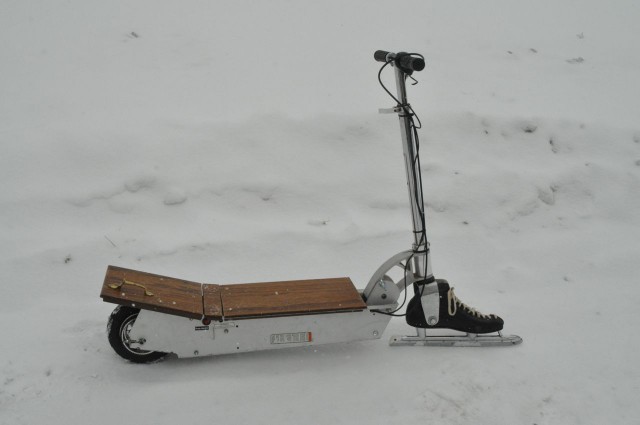
When I recently was at the thrift store and saw a pair of ice skates next to a kick-scooter, it got my mind going. “What would a scooter look like with skates in place of wheels!?”
The next time I was at the Makerspace, I saw my old electric scooter over on the Hack Rack. This was a scooter I originally rescued from a dumpster. Although it didn’t have batteries, just adding power and a little tinkering got it up and running again. A few of the EV Club and PowerWheels Racing guys played around with the scooter a bit, but eventually the controller got toasted, and who knows what happened to the front wheel.
Oh well, I’d be replacing that front wheel with an ice skate anyways.
Turns out that the heel of an ice skate is actually sturdy enough to drill right through and use as a mounting point. I simply drilled through the skate, inserted a spacer, and then ran a 3/8″ bolt through the skate and the front fork of the scooter. I finished it off with a couple of washers and a nut.
Then next thing to fix was to get the motor going again. Turns out that it’s a brushless motor. While I have a fair amount of experience now with BRUSHED motors, this was my first experience with brushless. I did a little research, and then ordered a 24V, 250 watt generic brushless controller from a mail-order scooter parts company. Unfortunately, it used a different style of throttle than what was already on the scooter, so I had to order a throttle to match.
Connecting the controller was pretty easy, three wires to the motor and the black and red one to power. I first bench-tested it with an old printer power supply, and once everything was working right, bit the bullet and bought a brand new pair of 12ah SLA batteries. The two batteries are wired in series, along with a 20 amp fuse, and then go to the controller.
I still needed a deck for the scooter. I dug through some scrap materials and found a pair of cabinet doors that were about the right size. I cut them down just a bit and bolted them to the scooter. I even re-mounted a cabinet door handle to have as an attachment point for towing a sled.
With that, I was ready to go for a test ride, so it was off to the lake. Once I was on the ice, I turned on the scooter and gave it a go! What fun! It really zipped along, but it was almost impossible to steer, as the back tire would slip right out from under me! Time for more traction!
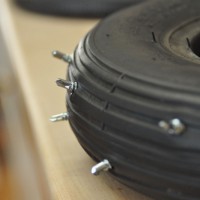
I decided to make a spiked tire. I removed the rear wheel, then disassembled the two-part rim and removed the tire and inner tube. I stuck 1/2″ self-tapping, pan-head, sheet-metal screws through the tire from the inside, so that their points stuck out. I evenly spaced out 24 screws and alternated them to be slightly off-center side to side. Next, I put some old scrap bicycle inner tube over them as a liner to protect the scooter tire inner-tube. After that, it was just a matter of reassembling everything.
Now for test #2 out on the ice. Remembering how much it hurt to fall on the ice, I was prepared this time by wearing my motorcycle jacket (which has padding built-in) and my helmet. Good thing too, as I would learn while steering with one hand and holding a GoPro camera in the other…. (Note to self, keep both hands on handlebars at all times.)
Overall, the Ice Scooter works great! I still have a few little things to do on it. For example, the motor is running “sensor less”, and I’d like to learn about how brushless motors use the sensor system. I’d also like to get a small 24V dedicated charger. As it is right now, I have to remove the deck and manually charge with a little 12V charger.
From thrift store idea, to hack rack, to life on the ice, it’s always fun to see what you can do with just a little ingenuity. I hope you like this project. If you want to see more on it, please check out the write-up I did on Instructables. It’s even in a few contests there, and I’d love your vote!
Keep on Making,
-Ben
