I really like the refreshing taste of San Pellegrino, but dislike that this water is bottled in Europe, shipped over water and delivered to me in Milwaukee, where we also have water. San Pellegrino costs about $1.75 per liter, and comes in recyclable bottles. The homemade version I’ve been making for the last four months costs less than one penny per liter, and is made in my kitchen in reusable bottles. The cost of the equipment was less than $150, which paid for itself after I’d carbonated my first 100 liters of water.
The equipment required is relatively simple: An aluminum tank that contains 5Lbs of CO2, a gas regulator, a hose ending with a locking Schrader air chuck, a plastic bottle, a bottle cap with a Schrader valve stem mounted in it and two hose clamps. All of these items are visible in the photos below.
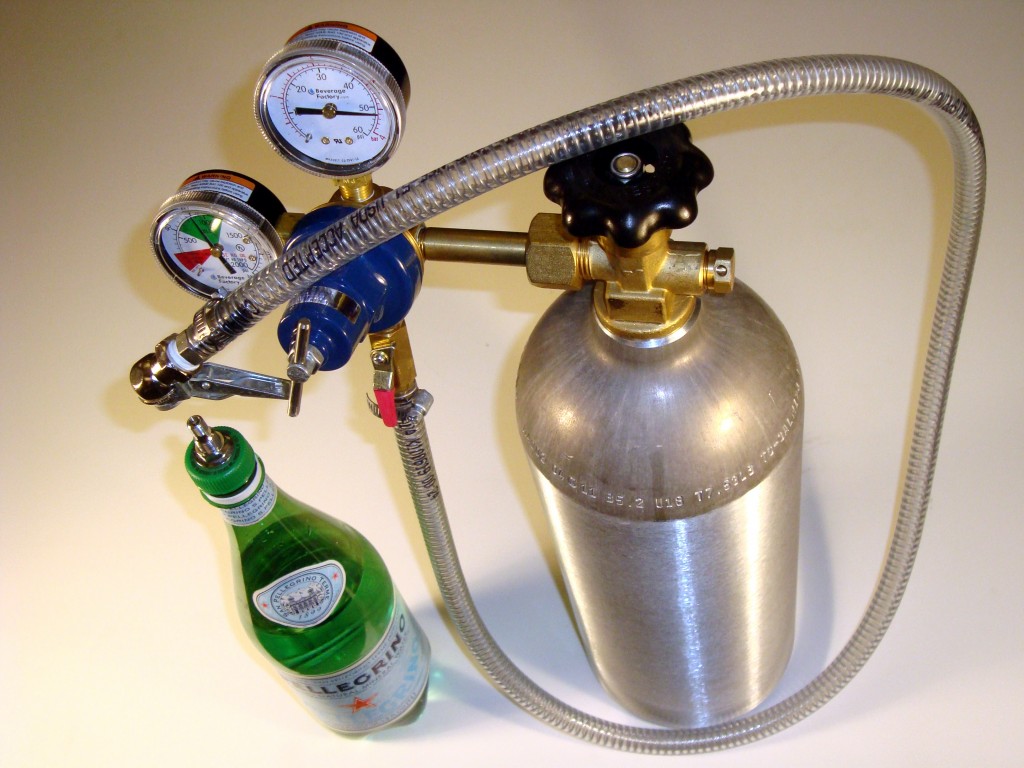
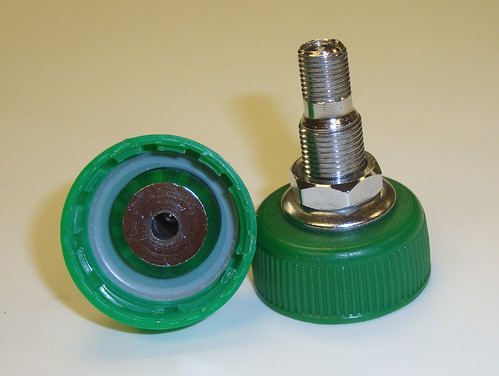
The aluminum tank and gas regulator are available locally at restaurant or homebrew supply stores, or online from places like beveragefactory.com or coppertubingsales.com. Prices at these latter two places are $85 – $100 for the pair. I filled the CO2 tank for $9 at a local beer retailer. I purchased the locking chrome plated air chuck, the stainless steel hose barb connected to it, the hose clamps, and the steel wire reinforced hose from a local hardware store for $15. The Schrader valve stems were purchased from a local auto parts store – they are fully chrome plated, and are sold as replacement car tire valve stems for $2 each.
I initially used standard industrial air hose fittings instead of Schrader valves, but ran into several problems. Only one side of this type of fitting seals when the mating fittings are disconnected. This means that after a liter is carbonated and the hose is detached from the plastic bottle, either all the CO2 in the hose leaks out, or some of the CO2 leaks out of the bottle. Also, inexpensive industrial air fittings are either made of steel or bronze and begin to corrode due to exposure to the carbonic acid formed when the water is carbonated. Chrome plated Schrader valves have neither of these problems, and are even less expensive than industrial air fittings.
The carbonation process is also simple. I fill a plastic San Pellegrino bottle 80% to 85% full of Brita filtered water chilled to ~36 degrees (standard refrigerator temperature), I squeeze all the air out of the bottle and tighten the plastic cap with the Schrader valve onto it. I fully open the CO2 tank valve, set the gas regulator valve to 55 PSI (typical commercial waters are carbonated to about 20 PSI), squeeze the locking Schrader air chuck, and lock it onto the bottle. CO2 immediately begins to flow, and inflates the bottle instantly. An audible hiss continues as the CO2 pressurizes the bottle, which I shake vigorously for 20 to 25 seconds, after which time the CO2 hiss has stopped. The hose is then disconnected from the bottle, and the water is carbonated!
All these details are important to successful carbonation. The empty space in the bottle (the 15% to 20% of the bottle that doesn’t contain water) is critical to allowing the CO2 to get and stay in suspension. The amount of CO2 that is soluble in water increases with colder temperatures. Squeezing out all the air allows for more CO2 to fit in the bottle. Shaking the bottle increases the rate at which the CO2 dissolves in the water. All of these factors make for more fizzy water (which is the goal, right?)
The taste of San Pellegrino can be more accurately replicated with the addition of minerals. With the addition of 1/8 tsp of Magnesium sulfate (Epsom salts) and 1/8 tsp of calcium chloride, one achieves the 210mg/L of Calcium and 60mg/L of Magnesium that San Pellegrino has! Both of these minerals are wine/beer brewing additives, and can be purchased from local homebrew supply stores. Check here for more mineral additive possibilities, and the book “The Good Water Guide” for the mineral composition of most commercial waters on Earth. I find that carbonating to 55 PSI rather than a more reasonable 20 to 25 PSI makes for so much more joy that I (and my kidneys) don’t miss the extra minerals.
If you want to make this setup at home, please follow these safety guidelines. There are several which are very important, as a gas cylinder is somewhat dangerous, as its internal pressure is between 700 to 800 PSI, depending on temperature. Carrying the cylinder by its valve is a bad idea. The tank should be secured at all times so it doesn’t tip over and damage the valve. When it is transported, it should always be upright and it shouldn’t be left in a car sitting in the sun, as the internal pressure will increase hundreds of PSI. The regulator you purchase should have a pressure safety valve which releases at ~60 PSI to vent excess pressure and prevent your plastic bottle from exploding. Similarly, your hose should be rated for higher than the pressure you intend to carbonate to. You should never carbonate in glass bottles.
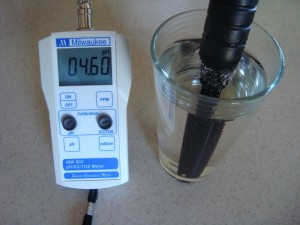
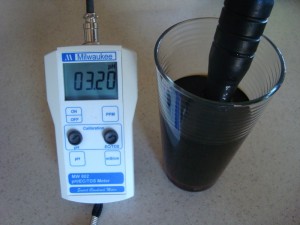
I measured the pH of my 55 PSI carbonated water, and found it to be 4.6, whereas the pH of Coke is a much more acidic 3.2, as shown below. The pH of my water prior to carbonation was a perfectly neutral 7.0.
Awesome. :-)
That single stage regulator will bleed out your tank once it gets below 500 PSI.
Works far better with a $150+ two stage unit VS the $35 one stager.
The gas pressure in the cylinder remains virtually constant until it is nearly empty and all the liquid CO2 has evaporated. Then the pressure inside the tank will start to drop, eventually reaching 500 PSI. It seems like spending an extra $115 on a fancier regulator to save the last 0.4% (3.6 cents) of a $9 tank of CO2 from “bleeding out” will only be worth it after I’ve refilled my tank 3194 times.
Cool setup. I have almost the same setup coming off of my keggerator to charge pelligrino bottles as well. One question: where did you find the chrome plated schrader valves? The only ones I could find are at the auto parts store and they are made of rubber, which has that ‘rubber’ smell which I don’t want in my water.
The replacement tire valve stems I purchased locally are similar to these: http://www.oreillyauto.com/site/c/detail/XTS0/1545592.oap?ck=Search_N1769_-1_3275 They have one necessary rubber seal, but are otherwise chrome plated steel.
It’s nice to have a well-stocked “junk box”!
I just built this for a total outlay of $9, for a pair of chrome valve stems and a good air chuck.
Not sure how much is left in my 20# CO2 bottle, but I’ll bet it’s far more than a full Soda Stream canister!
Hear what he says about gas cylinders and temps. I left my toolkit on the seat of my light aeroplane one night after working on it on an Australian outback airstrip. Came back in the morning to find a big mess. Sun had heated the CO2 bottles in the emergency kit, and they exploded. Pure luck nothing went through the canopy causing thousands of dollars damage and making plane unflyable.
beautiful.
i was trying to do something similar, but somehow use corny keg quick releases. your solution is so much cheaper and probably simpler. thank you!
HI good comments, i am thinking of making soda water to supply my local pub ,which is the best and cheapest way.Many thanks Ken
Clever bottling rig! Kudos!
Question: So if you’re shooting for 55psi, how much is retained from removing the Schrader-enabled cap and replacing it with a standard cap? I would assume you’d lose any increase over pre-filled commercial bottles. Assuming you wait for equilibrium, do it quickly, and when swapping caps you don’t jostle the bottle much. (it’s narrow at the neck and smooth so few nucleation sites)
Or do I have it wrong, and you always force carbonate water right before use? Is that even possible? Wouldn’t it come out of solution nearly instantly? See, I need a way to put a dozen or so liters in the fridge, in bottles that don’t scare the wife or look so D.I.Y. to guests/parents.
Thanks for sharing!
So, you want the bottles to look less
D.I.Y.Awesome? If you wait an hour or more for equilibrium, you should be able to swap out the Schrader cap for astandardboring one. You’ll lose the 55 psi in the top 1/7th of the bottle, which will definitely lower the total amount of CO2 in the bottle. When resealed, the bottle will come to a new and lower equilibrium pressure. It would be fun to use science to measure this pressure – but that would require a cap with both a Schrader valve and a pressure sensor!If I were you, I’d embrace my Homebrew roots and dispense carbonated water directly from a 2 or 2.5 gallon cornelius keg kept in the fridge. Many cornelius kegs are labeled “Max 135 PSI,” but I’ve heard that their relief valves open between 30 and 50 PSI, which will limit the amount of CO2 Joy in your glass.
You just need some awesome 3D printed doo-hickey to put on top of the valve on the cap. Make it look even more awesomer and fancier!
Brilliant. I’d also come up with exactly the same setup and used stainless steel tyre valves fitted to bottle caps, pub CO2 cylinder, comercial regulator and tyre pressure hose. Great minds think alike. I’m sure that the very small gas loss when swopping caps after a priod of stabilization hardly affect the final pleasure; the extra initial pressurization and refrigerated temperature will also help overcome any degradation. San Pellegrino bottles are slightly more heavy duty that the run-of-the-mill bottles you can get so be careful with any thinner ones, especially if creased due to squeezing. By the way, San Pellegrino is by far the best tasting table carbonated water. I’d like to start using vintage glass soda syphons but have yet to try this; I’m unsure as to what pressure the thick glass is rated to but I’m think it must be about 150psi so 50psi should be safe. Not quite sure of the mechanics yet though.
Its cool that we arrived at the same carbonating system, and I echo your sentiment on the merits of San Pellegrino! But, for safety, I do strongly discourage carbonating in glass bottles – especially vintage glass bottles. If the bottle fails, the resulting explosion of glass shrapnel isn’t fun to think about!
I agree about the cosequenses. Protection can be put in place in an industrial manner for glass containers, but I would never consider the use of inferior equipment. After all, home brewers use glass containers all the time.
Homebrewers do use glass carboys to ferment in, but the carboy is basically at atmospheric pressure. I say basically, because there is a 1″ water pressure head due to the water in the airlock, but this is 1/400th of an atmosphere, or 0.036 PSI.
The inability to carbonate glass bottles is a disappointing one for me. Then I might as well pre-carbonate the water in a corny keg (borrowing homebrewing techniques) and have it ready to dispense in much larger quantities at a preferred pressure.
Thank you for very good information.
I’m trying to decide 5LB CO2 tank or 20LB. Can anybody tell me how many bottles(1 liter bottles) can I make with 5LB tank??
I normally drink 5-7 liters a day.
From my first 5 lb tank, I made 204 1 liter bottles carbonated to 55psi. I’d expect that number to double if you carbonate to a more reasonable, though less joyful, 27psi.
Hello, I know this is an old article but I’m thinking of doing this and wanted to know how much per liter it would cost me. I saw in the article you mentioned less than a penny per liter, but here you’re saying you made 204 liters for $9? That comes out to 4.4 cents per liter, which is still great, but I’m curious about the discrepancy. I suppose the liters per 5 lb bottle is the more important number and I wanted to make sure I had the right idea for that. Thanks.
If you have a larger CO2 tank and carbonate to a more typical (lower) pressure, the price per liter is a penny or less. Perhaps you are on a budget, but I think the extra joy (carbonation) is worth it!
Hope this thread is still active. I have a couple questions re force carbonating water. I just got a CO2 setup like this but I’m using The Carbonater caps and a ball-lock instead of tire valves. I like my water really fizzy. I did a few 1/2 liter bottles last night. I started with very cold or iced water and pressurize to 45 lbs. shake 20-60 sec and and hold in the fridge for 20-60 min. to absorb.
I felt like the carbonation just came bubbling right out of the water when I opened the bottles and poured over ice or flavors. (I was hoping to feel the bite through my entire glass.) I held a few in the fridge for an hour and they also seemed to have less carbonation than I was looking for. Does bottle size affect the carbonation? We have pretty hard water in Austin so I wonder if that affects things too. Any thoughts or ideas are appreciated.
One last tidbit… Everyone online seems to say keep the tank upright but the guy at the place I filled my CO2 tank told me keeping the tank upright is not an issue. (They do CO2, Fire Extinguisher, and tank Hydro Certification) He said some beverage coolers have them installed on their side and that it should work the same. Sideways would really be an advantage to me as I have more lateral space that vertical. Does anyone have any experience with the orientation of the tank?
Thanks,
Doug
Doug, did you follow the steps in the paragraph that starts with “The carbonation process?” You start with cold water, but do you leave some headroom, squeeze out the air, and leave the hose attached to the tank while shaking the bottle? When I do that and then immediately pour the water into an empty glass, the carbonation is insane and joyful, exceeding my expectations. Ice typically has nucleation sites that cause the CO2 to precipitate out of suspension (ala mentos in diet coke) so it should be avoided. Similarly, flavors likely contain sugar, and affect the solubility of CO2 in water. I.e. Just try to carbonate the water to 45 PSI with the flavor already in it: It will foam everywhere when opened.
I have been squeezing air out and following the other guidelines. I found that charging the bottles then returning them to the refrigerator to rest a little before opening it seems to help.
I’m having a little better results today. I’ve been freezing a small amount of water in the bottles to help cool the water lower than refrigerator temp. I think using the ice in the glass does contribute to it going flat faster. I’ve liked it better straight out of the bottle. Thanks for the reply.
[…] only having members who are electronics enthusiasts. Well, in addition to the metal, wood, beer, water, whisky, fire, arduino, welding, odd, audio, casting, and numerous acoustic projects that […]
I have near same setup but use a ball-lock -> PET bottle adapter (with check valve). Achieves the same result but is food grade 100%. My only caution to yours is it looks like you are using reinforced tubing, I purposely made my tubing the weak link in case someone tries using the rig at dangerous pressures although I see that you are using a safety release. Nice article!
http://pulp.puckett.ca/2013/07/do-it-yourself-water-carbonation.html
What is the percentage/PSI / carbon dioxide maximum infusion? I like my seltzer hot, so carbonated that it burns. Limited by physics or hardware?
Typical beverage industry CO2 regulators only go up to 55 or 60 psi, which is why I typically carbonate to 50 or 55 psi. Its possible to go higher, but you’ll have to buy a higher rated gas regulator, and higher rated CO2 hose. You’ll also have to worry about the ultimate strength of the bottles you are carbonating in. Alternately, you could carbonate in Cornelius Kegs that homebrewers typically use. They’re apparently rated to over 100 PSI, though I’d double check that on the particular keg you purchase, and leave a healthy margin for safety. Because the pressure inside is very temperature dependent, do not carbonate very cold liquid to 100 PSI, and then leave that keg out of refrigeration, or in your car. If you do, the pressure inside will rapidly increase! The good news is that Corny kegs do have a pressure release valve in their lid, which will likely prevent an explosion.
This writeup is great. I recently put together a setup at home to make my own carbonated mineral water. When I add the calcium chloride to the water it leaves behind flakes that don’t dissolve. Is it supposed to be like this? How do I get the calcium chloride to fully dissolve?
Thank you!
How much calcium chloride are you dissolving in one liter?
Also if you are adding other salts at the same time, avoid that and dissolve the calcium chloride first it takes time and a little shaking, when it dissolves add the other salts, that has worked for me
I have a similar setup, but eschewed the Schrader valves. I purchased a couple “Fizz Giz” caps which are based on using a football valve instead of a tire valve. So my current set up is: 20# tank and dual regulator (bought on craigslist for under $100 because BF said I couldn’t use our spare kegerator bottle), high pressure tubing, food-grade (Lowes, believe it or not it is marked food grade), air gun, needle, and fittings (harbor freight, under $10 for the lot). I put the 2 liter bottle in the fridge before I charge it so the water is cold. I have my pressure set between 50psi and 60psi (I don’t recall right off).
Now, the “problem” with the caps is that not all bottles are created equal. With some bottles it hisses and some it doesn’t. So I have to check the bottler to see whose bottles work (Coca Cola bottles do not).
I just purchased a stainless steel version of the carbonator cap for about the same price as the plastic one from homebrewstuff.com. I got the corresponding corny keg adaptor (for between the CO2 and the cap). I’m hoping this method works better (ie: more universally) than my current method. And easier, BF doesn’t like my “rigged” projects – he uses the glass seltzer bottle because its easier to charge with the little cartridges.
As for charging in glass, I’ve read it can be done PROVIDED the bottle is designed for high pressure. Some of the sparkling water bottles have screw-on tops that are compatible with soda bottle tops. I HAVE NOT done this so if you are going to play with it you’re doing it AT YOUR OWN RISK. Also, there is a cap for champagne bottles (these are definately high-pressure rated) that is on my wish list because it costs as much as my whole rig: http://bostonapothecary.com/?p=460
Excellent post! For further suggestions on minerals to add, check out my Excel mineral water calculator:
http://blog.khymos.org/2012/01/04/mineral-waters-a-la-carte/
I store the carbonated bottle with the chrome tire valve stem left on. Is there any health issues with the interaction of the chrome and the carbonated water?
Nope, chrome is pretty inert.
brilient achivment.that is extrimly very good idea.i am very impressed.
Great Post!
Wish I had found this sooner, so a good read and very informative.
Thank you Kevin.