Giant, Ominous Wind Chimes

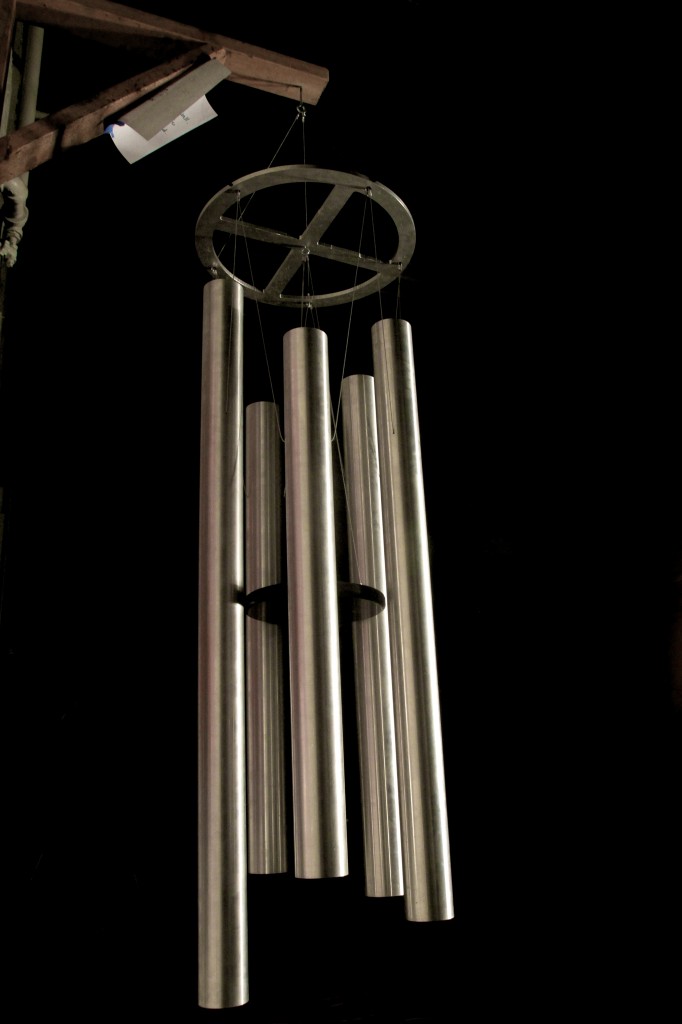
A while back I bought five 4.5 foot long aluminum tubes because the price was so low that I couldn’t resist.  They are 3.25 inches in (outer) diameter, and have a wall thickness of 0.1 inches.  Recently, I decided to make them into the longest and loudest wind chimes I’ve ever heard.  The longest tube rings for over a minute after being struck by the clapper.  After thinking for a while about which notes I should tune the tubes to, I found that fairly large chimes are commercially available, but they are tuned to happy, consonant intervals.  I consulted a few musically savvy friends (Thanks Brian and Andrew!) to gather some more ideas for interesting intervals on my chosen theme of “Evil & Ominous.” I ended up with quite a few ideas, and with Andrew’s help, I sampled the sound of the longest tube being struck, and recorded mp3’s of each set of notes to simulate the sound of the chimes ringing in the wind.  I ended up with something delightful: D4, G#4, A4, C#5 and D5 (which are 294 Hz,  415 Hz, 440 Hz, 554 Hz, and 587 Hz).  That’s right, there are two consonant intervals (octave and major 5th), but look at all those minor seconds and tritones: Delightfully Ominous!

Then the science started:  How to determine the tube lengths to achieve the desired notes?  How to suspend the chimes so they sound the best, and are the loudest?  Where should the clapper strike the chimes in order to produce the loudest sound or the best timbre?

Wind chimes radiate sound because they vibrate transversely like a guitar string, not because they support an internal acoustic standing wave like an organ pipe.  Pages 152 & 162 of Philip Morse’s book “Vibration and Sound” show that the natural frequencies, v, of hanging tubes are given by the following expression:

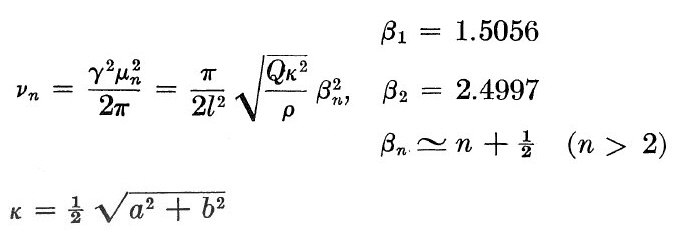
Pretty simple, right?  One only needs to know rho and Q, the density and Young’s modulus of aluminum, l, the length of the tube, a & b, the inner and outer radius of the tube, and the beta of each tube mode of  interest.  Don’t worry though, there is a simpler way.  If all of the tubes have identical diameter and are made of the same material (6061-T6 Aluminum!), the equation indicates that the natural frequency of a hanging tube scales very simply as the inverse of the tube length squared.

Using the above relationship (frequency ~ 1/(length*length)) to compute the ratios of tube lengths based on the ratio of frequencies produces:

Length of D4 tube = 1.000 * Length of D4 tube

Length of G#4 tube = 0.841 * Length of D4 tube

Length of A4 tube = 0.817 * Length of D4 tube

Length of C#5 tube = 0.728 * Length of D4 tube

Length of D5 tube = 0.707 * Length of D4 tube

The longest tube is 133.1 cm (52.40 inches) long, so all the tubes were scaled relative to it.  Note that the frequencies are slightly different than the notes I was aiming for, but absolute pitch is only a requirement when playing with other instruments.

~D4 = 293.66 Hz = 133.1 cm = 280.3 Hz

~G#4 = 415.3 Hz = 111.9 cm = 396.4 Hz

~A4 = 440.0 Hz = 108.7 cm = 420.0 Hz

~C#5 = 554.37 Hz = 96.9 cm = 529.1 Hz

~D5 = 587.33 Hz = 94.1 cm = 560.6 Hz

How accurately do these tubes need to be cut?  For example, how important is it to cut the tube length to within 1 mm?  This can be calculated simply, using the above equation.  A length of 108.7cm gives 420.0 Hz, whereas a length of 108.8cm gives 419.23 Hz.  This spread is 0.67 Hz, which is a fairly small number, but these small intervals are often expressed in cents, or hundredths of a half-step.  This 1 mm length error gives a frequency shift of 31cents.  Does this matter?  Well, the difference in pitch of a major third in just and standard tuning is 14 cents, which is definitely noticeable.  It is preferable to be somewhat closer than this 1mm, or 2/3 Hz to the target interval.

The tubes were rough-cut to 2 mm longer than the desired length on a bandsaw to allow the ends to be squared up in case the cut was slightly crooked.  The resonance frequency was then measured by playing the desired frequency from a speaker driven by a sine wave generator with a digital display.  I then struck the tube and listened for (and counted) the beats.  If two beats per second are heard, the frequency of the tube is 2 Hz different than the frequency played through the speaker.  With this method using minimal equipment, I quickly experimentally measured the resonance frequency to less than 0.5 Hz (one beat every two seconds), which is ~10 cents.  I then fine tuned the tube length using a belt sander, and measured the resonance frequency several times while achieving the correct length.  In reality though, if I missed my target lengths I’d only be adding a little more beating and dissonance, which might have only added to the overall ominous timbre.

How to suspend the tubes?  Looking at the mode shapes of the tube for guidance, I suspended the tubes by drilling a hole through the tube at one of its vibrational nodes, and running a plated steel cable through it.  Check out the plot below from Blevins’ New York Times Bestselling book “Formulas for Natural Frequency and Mode Shape.”

This plot shows a snapshot of the tube’s deflection as a function of position along the tube.  Imagine that the left side of the tube is at 0, and the right side of the tube is at L.  This plot shows the first three mode shapes of a “straight slender free-free beam,” which my 1.33 meter long, 83mm diameter tube qualifies as.  Just like a guitar string, this tube has multiple overtones (higher modes, or harmonics) that can be excited to varying degree depending where the clapper strikes the tube.  The guitar analog of this is the timbre difference one hears when picking (striking) the string closer to or further from the end of the string (the bridge).  This plot also shows where the tube should be suspended – from the locations where the tube has no motion in its first, fundamental mode.  Those two places, a distance of 0.221L from the tube’s ends, are circled in red.  When striking the tube suspended from either of these locations, the tube rings the loudest and for the longest time duration (as compared with any other suspension location).  Similarly, when striking the tube in the location noted by the red arrow (the midpoint of the tube), the tube rings the loudest.  I won’t get into more math and fancy terms like “modal participation factor,” but it is true that suspending the tube from the circled red locations also results in the lack of excitation of the third mode (which has a motional maximum at this location).  Similarly, striking the tube at its midpoint results in the lack of excitation of the second mode, due to its motional minimum at this location.

Thanks to David for the Ominous Photo.   An Ominous Chime video will soon follow.

Making Carbonated Mineral Water

I really like the refreshing taste of San Pellegrino, but dislike that this water is bottled in Europe, shipped over water and delivered to me in Milwaukee, where we also have water.  San Pellegrino costs about $1.75 per liter, and comes in recyclable bottles. The homemade version I’ve been making for the last four months costs less than one penny per liter, and is made in my kitchen in reusable bottles.   The cost of the equipment was less than $150, which paid for itself after I’d carbonated my first 100 liters of water.

The equipment required is relatively simple: An aluminum tank that contains 5Lbs of CO2, a gas regulator, a hose ending with a locking Schrader air chuck, a plastic bottle, a bottle cap with a Schrader valve stem mounted in it and two hose clamps.  All of these items are visible in the photos below.

Carbonation Caps With Fittings

The aluminum tank and gas regulator are available locally at restaurant or homebrew supply stores, or online from places like beveragefactory.com or coppertubingsales.com.  Prices at these latter two places are $85 – $100 for the pair.  I filled the CO2 tank for $9 at a local beer retailer.  I purchased the locking chrome plated air chuck, the stainless steel hose barb connected to it, the hose clamps, and the steel wire reinforced hose from a local hardware store for $15.  The Schrader valve stems were purchased from a local auto parts store – they are fully chrome plated, and are sold as replacement car tire valve stems for $2 each.

I initially used standard industrial air hose fittings instead of Schrader valves, but ran into several problems.  Only one side of this type of fitting seals when the mating fittings are disconnected.  This means that after a liter is carbonated and the hose is detached from the plastic bottle, either all the CO2 in the hose leaks out, or some of the CO2 leaks out of the bottle.  Also, inexpensive industrial air fittings are either made of steel or bronze and begin to corrode due to exposure to the carbonic acid formed when the water is carbonated.  Chrome plated Schrader valves have neither of these problems, and are even less expensive than industrial air fittings.

The carbonation process is also simple.  I fill a plastic San Pellegrino bottle 80% to 85% full of Brita filtered water chilled to ~36 degrees (standard refrigerator temperature), I squeeze all the air out of the bottle and tighten the plastic cap with the Schrader valve onto it.  I fully open the CO2 tank valve, set the gas regulator valve to 55 PSI (typical commercial waters are carbonated to about 20 PSI), squeeze the locking Schrader air chuck, and lock it onto the bottle.  CO2 immediately begins to flow, and inflates the bottle instantly.  An audible hiss continues as the CO2 pressurizes the bottle, which I shake vigorously for 20 to 25 seconds, after which time the CO2 hiss has stopped.  The hose is then disconnected from the bottle, and the water is carbonated!

All these details are important to successful carbonation.  The empty space in the bottle (the 15% to 20% of the bottle that doesn’t contain water) is critical to allowing the CO2 to get and stay in suspension.  The amount of CO2 that is soluble in water increases with colder temperatures.  Squeezing out all the air allows for more CO2 to fit in the bottle.  Shaking the bottle increases the rate at which the CO2 dissolves in the water.  All of these factors make for more fizzy water (which is the goal, right?)

The taste of San Pellegrino can be more accurately replicated with the addition of minerals.  With the addition of 1/8 tsp of Magnesium sulfate (Epsom salts) and 1/8 tsp of calcium chloride, one achieves the 210mg/L of Calcium and 60mg/L of Magnesium that San Pellegrino has!  Both of these minerals are wine/beer brewing additives, and can be purchased from local homebrew supply stores.  Check here for more mineral additive possibilities, and the book “The Good Water Guide” for the mineral composition of most commercial waters on Earth.  I find that carbonating to 55 PSI rather than a more reasonable 20 to 25 PSI makes for so much more joy that I (and my kidneys) don’t miss the extra minerals.

If you want to make this setup at home, please follow these safety guidelines.  There are several which are very important, as a gas cylinder is somewhat dangerous, as its internal pressure is between 700 to 800 PSI, depending on temperature.   Carrying the cylinder by its valve is a bad idea.  The tank should be secured at all times so it doesn’t tip over and damage the valve.  When it is transported, it should always be upright and it shouldn’t be left in a car sitting in the sun, as the internal pressure will increase hundreds of PSI.  The regulator you purchase should have a pressure safety valve which releases at ~60 PSI to vent excess pressure and prevent your plastic bottle from exploding.  Similarly, your hose should be rated for higher than the pressure you intend to carbonate to.  You should never carbonate in glass bottles.

I measured the pH of my 55 PSI carbonated water, and found it to be 4.6, whereas the pH of Coke is a much more acidic 3.2, as shown below.  The pH of my water prior to carbonation was a perfectly neutral 7.0.

Basic and Premium StrobeTV

Do you ever want to watch a movie at home, but can’t decide between your favorite two?  Maybe your favorite TV show is about to start, but you’re still watching a film on DVD?  Perhaps you and a friend can’t agree on which film to watch? Well, you need not fret if you’re an early adopter of StrobeTV – a new device that enables the viewing of TWO films simultaneously on a single television by simply alternating between them!  The basic version features two knobs for fine-tuning your experience.  One sets “impatience,” which is how long you’ll view and listen to one film before switching to the second film.  This can be set from once every10 seconds and mere fractions of a second! The second knob controls “preference” or the relative amount of time spent watching the first or second film – perhaps you want to view the first film 60% of the time, and the second 40%.  Or, might it be 25% first and 75% second?

If you’re the proud owner of the Premium StrobeTV, a world of customization is achievable using the eight three position switches and two knobs.  The upper row of switches configures the experience you’ll enjoy for an amount of time set by the upper knob.  When this time expires, your experience is set by the lower row of switches for the amount of time selected by the lower knob.  Naturally, the process repeats, endlessly alternating between your two chosen forms of entertainment – be that TV, DVD, Netflix, gaming consoles, etc.  Perhaps you feel you’ll miss out on important action while you’re watching one film? Premium StrobeTV allows you to listen to the left and right audio channels of the second film, while you view the image from the first film!  Maybe you’re more comfortable reserving the left speaker for playing the left channel audio for the film you’re not currently viewing?  Or maybe the audio alternates? With StrobeTV, the possibilities are virtually endless.  Premium StrobeTV has an enhanced switching range, from once per 15 seconds to over forty times per second, ensuring you won’t miss a single detail!

Premium StrobeTV features an ingenious 2 meter long  cable that allows the controls to be at your fingertips, while the wiring remains hidden away.  Note that Premium StrobeTV, like its more economical sibling, allows for the switching of four signals: right audio, composite video, left audio, and a forth signal of your choice!


Mechanized Cylindrical Sign Build for Parade Joy (Update 4)

We’re coming to the end of our South Shore Frolics Parade Float builds! This has been an incredible process. Last night we put the graphics on the cylindrical sign, and stood back to enjoy the glory of our handywork. 

Thanks to Tom, Kevin, Matt N., Bob, Mike, Shane, Elizabeth, Adam, Sean, Kristin, Amanda, Jason, Aaron, and anyone I might have missed who helped get this together!

I pose next to the completed thing. Intense!!!

David

Mechanized Cylindrical Sign Build for Parade Joy (Update 3)

The Mechanized Cylindrical Sign Build is getting close! Last night the sign was bolted to the vehicle, a window was cut, and screen was put into the window. This piece is really starting to come together!!!

View out the window.


View out the top from inside.

View of the seat and window.

Safety is everyone’s job.

That is one mad machine!

David