 I sketch quite a bit and I’ve been doodling things like this for years without realizing that, technically, they fall under the “Art Deco” category. If I were content with that, I’d paint it blue, pink, and silver. However, because cerulean blue belongs in the sky and not on your wall, pink belongs in distant sunsets and not on your wall, and why the hell would you paint wood silver? I decided that to bring this piece into the 21st century I’d need to radically rethink the colors.
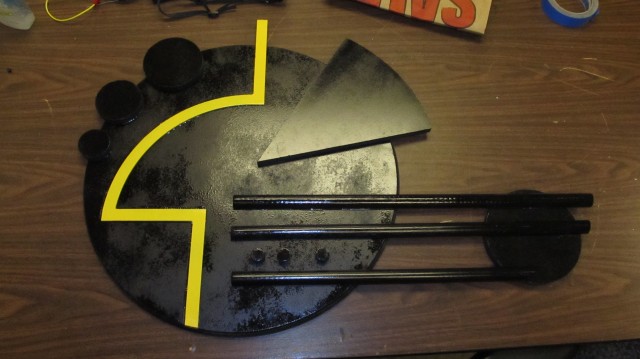
At first, I had intended to only paint 3 elements of the composition. After picturing it in my mind, I decided on the single yellow piece that you see here. I’m quite pleased with the end result. Unfortunately, the spray-acrylic sealer that I used was very old and I suspect that it was this that led to the strange patina you see on the main circle here. No matter what I tried, I kept getting glossy parts and flat parts.
The primary material is MDF, some of which was cut with our very own CNC router, with hardboard being used for the yellow part, and split pine dowels (thanks to my own rig, clamped to our band-saw) for the 3 extending pieces.
*Note: When cutting a perfectly cylindrical piece length-wise on a band-saw, the piece will have a tendency to rotate as you’re cutting. I’d have done a better job had I thought to clamp the piece to the jig that I set up.
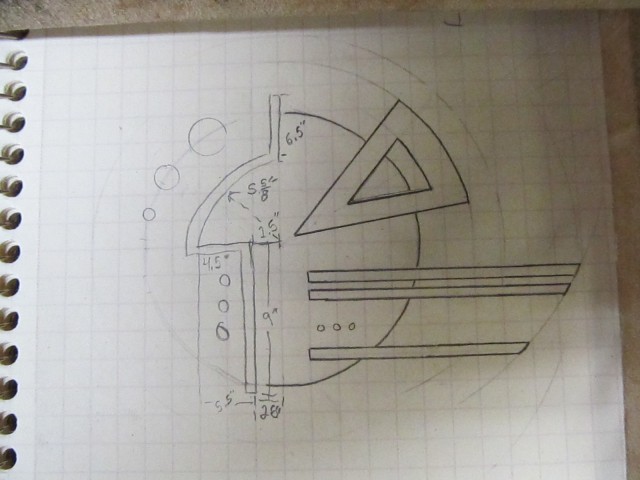 This is the rough sketch of what I had planned on making. Things change in a wonderfully organic way when you go from sketch to completed project.
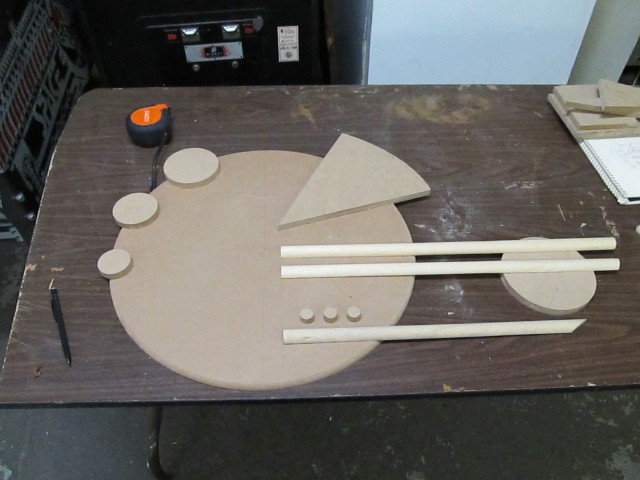 The piece before painting and assembly.
I laid the pieces out separately and hit them with flat-black spray paint. This took very well to the MDF. After painting and clear-coating everything, I waffled about how to assemble the many into the whole. I first toyed with the notion of pre-drilling, then screwing everything in from the backside of the piece; I also realized what a pain it would be to try to locate each hole without being able to see the front first.
Next, I thought I’d use a brad-nailer and just pop everything in, but ours doesn’t take anything shorter than 5/8″ and this entire project is just under 1/2″ in depth and I didn’t want to bother cutting the ends of the brads flush with the back, plus, they could scratch the wall that it hangs on.
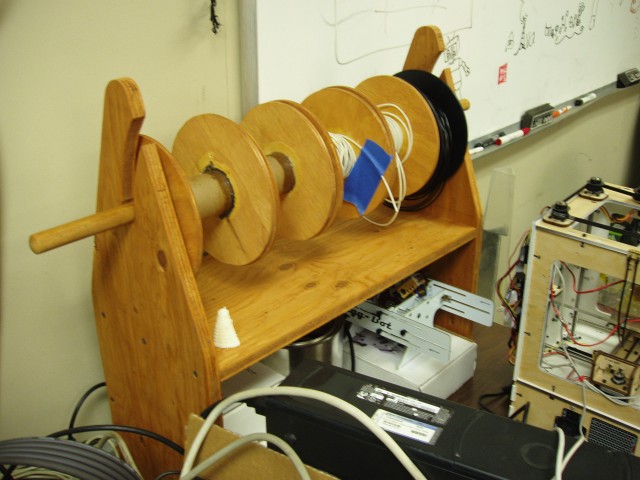
I finally decided on some epoxy that one of our makers had brought in. It’s proven very workable and durable, as I found out when I used it to make the spools for our Makerbot ABS plastic filament. I put several pieces on at a time, weighting them down with some paving bricks (covered in cloth, as I didn’t wish to scratch the paint). After letting it cure for 24 hours, the project was more-or-less done.
All that’s left is to figure out how to mount it to a wall. I think I might use a plunge router and hollow out a portion of the back for that. Another idea has been brewing in the back of my mind, but it’s too cool to mention unless I actually do it. Rest assured, if I use that idea, I’ll be posting about it here and on Instructables.
UPDATE: I found that it’s about the same weight as a moderately sized picture, so I picked up some picture-wire and attached it via two screws in the back. It is now hanging on my bedroom wall.