Halloween Skull Project

I want to open my first blog post with a statement that continues to impress me: Milwaukee Makerspace is a wonderful place! I mostly show up for the free meetings.  MMS provides an excellent environment to be social, to learn (happens every time I go!), to teach (when I can!), and to get the creative juices flowing.

I had recently started working with Arduino (after a failed run at Microchip’s PIC series of microcontrollers), and was making progress quickly.  I learned how to read infrared remote control codes, how to use an infrared motion sensor, and how to control servos. What I did not have, was a sense of direction as to where to go with all of this!

After listening to the Bay View Neighborhood Associate pitch their idea of MMS helping with the Pumpkin Pavilion, and listening to Royce Pipkins describe his idea of animatronic pumpkins singing along to a song, I was struck with my own idea: an animatronic skull.

Thus, it was born!

http://vimeo.com/55121596 <- Link to the video

I’ll post more details in a following post about how I built this guy. :)

Many thanks to Royce, Tom G., and Ed C. for their help on this project!

IBC Tote Aquaponics

About 3 months ago, in caffeine fueled bravado, two of my friends and I decided to try to build an aquaponics farm in Botswana, a country in Southern Africa. After a lot of reading, field trips to a few impressive facilities, and a trip to Africa, where we secured a partnership with a local institution, we wisely decided to build a system locally first.

Aquaponics is a mixture of hydroponics (soil-less agriculture) and fish aquaculture (hence the cat’s laser-like focus). It is a symbiotic process, where the fish’s organic waste fertilizes the plants, and in return are supplied with filtered water. The only system input is fish food.

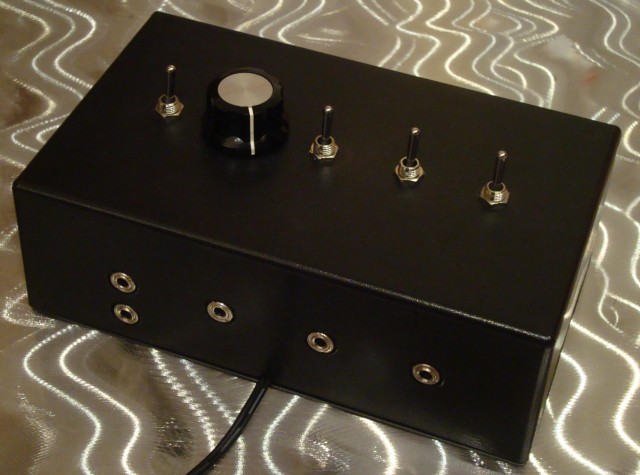
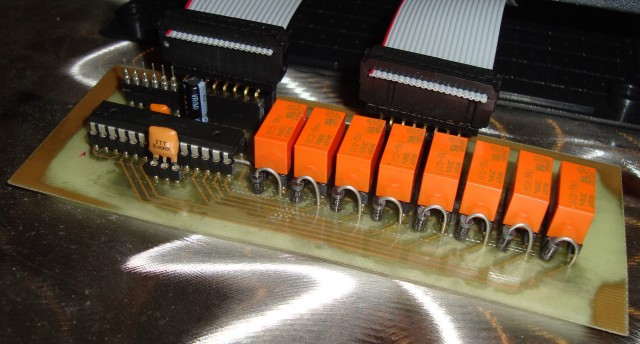
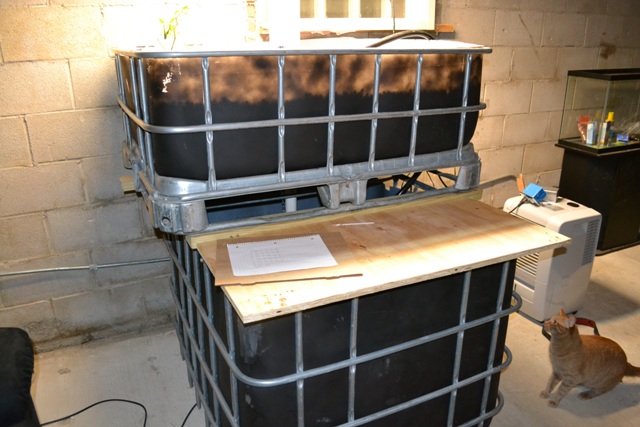
The two (2) black plastic boxes pictured above used to be one (1) 330 gallon IBC tote, which are usually used to store and transport fluid and other bulk materials. We cut the container about cut about two-thirds of the way up. The larger bottom tank holds 40 yellow perch for now – it can support about 80-90 fish. Water from the fish tank is pumped through the black pipe in 10 minute on/off cycles to the grow bed above. An Arduino housed in the blue box to the right controls the pump and also monitors water temperature. We plan on adding sensors to monitor the water chemistry (pH, nitrates, etc.) in the future.

The grow bed is media based. In other words, we use a mixture of rocks and expanded clay (the red stuff) to support the plant’s roots and act as a bio-filter to filter the water and convert fish waste (ammonia and nitrites) into plant food (nitrates).  The filtered water falls back to fish tank through the PVC pipe (there are several small holes under the rock), which introduces oxygen via percolation and completes the mostly closed-looped cycle. A set of six (6) full spectrum T5 lamps provide the artificial light. The first crop of tomatoes, radishes, pepper, lettuce, and some wicked cucumbers is sprouting in the plastic containers and should be planted within the media within a day or two. We are expecting the first harvest in 4-6 months.

So now that we are seasoned farmers, we have launched a campaign to build a larger, floating-raft system in Botswana at a local institute of agriculture. We are currently in the fund raising phase on indiegogo. If everything falls into place, we will start construction in late summer (winter over there) of next year.

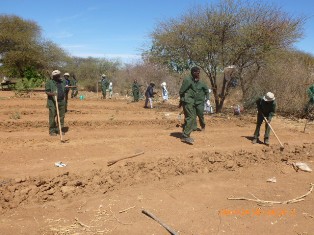
Pictured below is the reason we are pursuing this project. It hasn’t rained there since 2009. Combine that with the poor soil and the country has to import almost 100% of its vegetables and most fruits. We are hoping that water and energy efficient aquaponics based farming that produces hormone and chemical fertilizer free fish and plants is the answer.


SAGA: Semi-Automatic Gmail Assistant

My friend Rob is a smart engineer, and throughout the course of a work week he receives dozens of requests for his assistance on various projects.  He’s such a positive and helpful person that he finds it difficult to say “No.” to any of these requests.  I’ve helped him out by making a USB device that can provide a clear and simple email response to some of these requests.  SAGA, or Semi-Automatic Gmail Assistant, is approximately the size of a mouse, and plugs into a computer just like any mouse or keyboard would.  Here is the first prototype:

SAGA comes complete with a key lockout feature that prevents accidental activation. Once a worthy email request has been received, Rob can calmly make the call whether or not to arm SAGA by inserting the key, and rotating it clockwise 90 degrees.  After rotating the key, an octagon of LEDs lights up around the chrome button, enticing Rob to press it.  The extra illumination from the LEDs also further highlights the artfully coiled wiring that fills the prototype SAGA.  When the button is pressed, SAGA sends the keyboard shortcut to respond to the email and types out “Go F*** Yourself.” at a respectable and slightly humorous 200 wpm.  After waiting a half second for dramatic effect, SAGA automatically sends the email.  Note that there is a 1% chance that SAGA will instead respond “That’s a Great idea, I’ll get right on it!”

SAGAis powered by a Teensy 2.0 and $15 of electronics parts.  SAGA appears to the computer as a standard keyboard, and some helpful startup hints I followed appear on RasterWeb! and here.  One enabling trick was using a 2n2222 NPN transistor to drive 140 mA into the eight LEDs (connected in parallel), as this value exceeds the current available from any one of the Teensy’s outputs.  Note that keyboard shortcuts must be enabled in Gmail settings, and that Yahoo! Mail is also SAGA compatible. Upon moving an internal jumper, SAGA is probably compatible with some versions of Outlook (although installation of service pack 3.0 may be required).

Due to popular request by the few folks who have seen SAGA in action, I’ve built up a few, and they are for sale now on Etsy.  Check out the aesthetically pleasing, high gloss powder coated aluminum enclosure! Here is SAGA in high-speed yellow:

Alternate colors are available too – Just follow this link to Etsy!  

Arduino-Powered Surround Sound Synthesizer

The Makerspace Eight Speaker Super Surround Sound System(MESSSSS) has been supplying music to the Makerspace for quite a while now, but I identified a problem even before the system was fully installed.  Stereo recordings played back on two speakers are great if you’re in the “sweet spot.” If not, traditional approaches to 5.1 audio improve things, but all rely on there being a single “front of the room.” Unfortunately, it’s not clear which side of the 3000 square foot Makerspace shop is the front, and with four pairs of speakers in the room, even stereo imaging is difficult.

Fortunately, I’ve just completed the Makerspace Eight Speaker Super Surround Sound System’s Enveloping Surround Sound Synthesizer (MESSSSSESSS).  The MESSSSSESSS takes stereo recordings and distributes sound to the eight speakers in an entirely fair and user configurable way, thereby eliminating the need for a “front of the room.” Now listeners can be arbitrary distributed throughout a room, and can even be oriented in random directions, while still receiving an enveloping surround sound experience!

The MESSSSSESSS user interface is somewhat simpler than most surround sound processers, as it consists of only four switches and one knob.  Somewhat inspired by StrobeTV, the simplest mode references questionable quadraphonic recordings, in that the music travels sequentially from speaker to speaker, chasing around the room either clockwise or counterclockwise at a rate selected by the knob. With the flip of a switch, sound emanates from the eight speakers in a random order. Things get considerably less deterministic after flipping the Chaos Switch, adjusting the Chaos Knob, and entering Turbo Mode:  Its best to visit Milwaukee Makerspace to experience the madness for yourself.  I’m legally obligated to recommend first time listeners be seated for the experience.

The MESSSSSESSS is powered entirely by an Arduino Uno’s ATmega328 that was programmed with an Arduino and then plugged into a socket in a small, custom board that I designed and etched at the Makerspace.  The ATmega328 outputs can energize relays that either do or don’t pass the audio signal to the four stereo output jacks.  Care was taken to use diodes to clamp any voltage spikes that may be created as the relays switch, thus preventing damage to the ATmega328 outputs.

As shown by the minimal part count above, using the ATmega328 “off the Arduino” is quite easy:  Just connect pins 1 (The square one), 7 and 20 to 5 volts, and connect pins 8 and 22 to ground.  Then, add a 22uF cap and small bypass cap between power and ground, and a ceramic resonator to pins 19 and 20.  You can even use an old cellphone charger as the power supply.  Boom.  That’s it.  The real benefits of making your own boards are having a well integrated system, and cost, as the Atmel chip is $4.50 while a whole Arduino is $30.  Also visible in the photo are a programming header and the two ribbon cables that route all the signals to and from the board.

Random Find: The Avago/HP HDLG-2416

Anyone who’s ever visited Makerspace knows that the ‘Library’ is home to tons and tons of stuff.  Component parts, IC chips, belts, pulleys, batteries, etc.  Occasionally I lose myself in there for a few hours and just explore the shelves.  This is a post about one of my more interesting discoveries.


I came across a whole bag of these in the LED bins.  They’re 1″ wide, four-digit alphanumeric displays.  Each character consists of a 5 mm tall, 5×7 LED dot matrix display.  The device comes complete with on-board RAM and an ASCII decoder capable of displaying up to 128 different characters.  It’s even possible to dim the brightness.  I’m also partial to the color green.

The major drawback I’ve found is the number of pins required for use.  The thing has seven data pins and the extended features for writing/reading/displaying require a ton of connections.  I used all but four of my Arduino Uno’s I/O pins while tinkering with it.  You’re probably better off using a LCD display or something with serial data support, but these are still small and numerous in our ‘Space so they’re worth toying with.  Also there’s been a few other people who played with these and posted their findings online. I’m seriously considering building a small desk clock around one or two of these in the future.

If you’re interested in using one of these displays on your next project, I’d suggest reading the blogs by these fine folks here:

http://buzzdavidson.com/?p=148

http://dorkbotpdx.org/blog/wardcunningham/yow_revisited_in_txtzyme

http://gorgusgfx.se/?page_id=62 (I think this is in Swedish, but the code still works!)